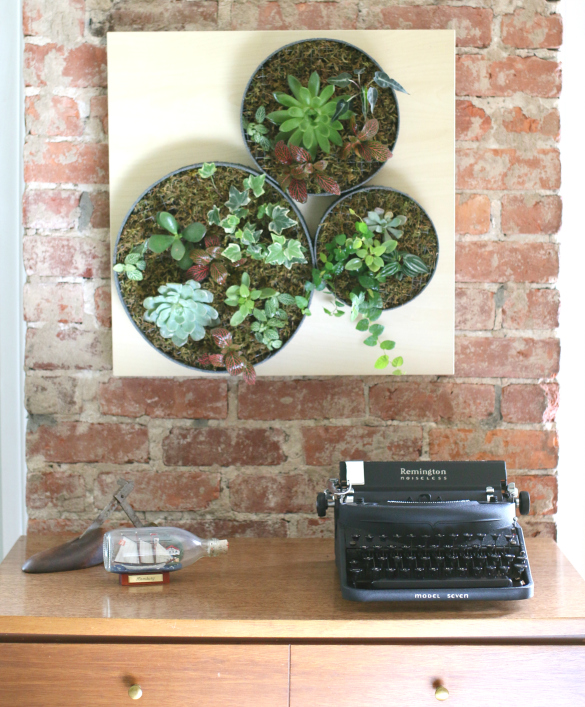
Over the last couple of weeks we've been stretching our creative muscles and working with new-to-us materials on what's turned out to be one of our favorite new projects — the hanging vertical wall garden pictured above.
To give a little background, when we were invited to take part in a project challenge with a group of 5 other eHow bloggers we admire, it was a no brainer saying "sure!" The concept is simple — we were each asked to use the same specific materials and our imaginations to create a home decor project. For this #ProjectThrowdown challenge, each creator was asked to use:
1. Ikea Lack Table
2. One sonotube
3. Paint, stain or decoupage
4. Chain


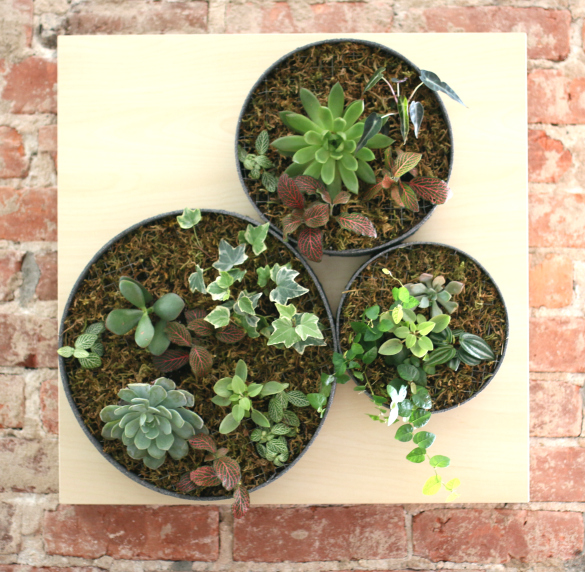
We love how it turned out — there's depth, texture and an interesting intermingling of materials between the faux birch, stone finish and natural plants. The challenge has been fun to participate in and definitely got us thinking outside the box with materials we might not have normally used. We're also big fans of Ikea Hacks and can now say we've hacked a Lack table (say that 5 times fast). With that, we've been eager to share the full project details here one the blog.
- Ikea Lack Table
- Link chain, 3/4-inch coated
- Screws (#10 3/4) & Screwdriver
- 3 Sonotubes, 12-inch, 10-inch and 8-inch round
- Box cutter with sharp new blade
- Medium to coarse grit sandpaper & (optional palm sander)
- Liquid rubber
- Stone textured spray paint
- Wire hardware cloth
- Protective gloves
- Permanent marker
- Wire cutters
- Aquarium glue
- Potting soil
- Floral moss
- Various sized and shaped succulents and small decorative plantings
- Chopstick
Half of the adventure during this challenge was gathering the materials. When picking up the Lack table from Ikea, it was the large square tabletop that really spoke to us as the vision for this vertical wall garden. Discarding the legs for use in another project down the road, we then played around with various sized sonotubes to make a stacked design that would fit within the perimeter of the tabletop base. Here we are in Ikea looking for the Lack table and later in the hardware store, trying to visualize a design with the sonotubes on top of the tabletop:

Yep, I'm sure we got a few strange looks along the way, but hey — it's all in the name of DIY! Looking back at these photos from sourcing the materials list, it's pretty amazing to see how they transformed into something completely new:

Here's the full rundown on how we made the wall garden...
Knowing we'd use the chain as a sturdy backing support to hang the finished wall garden, Tim went ahead and installed the chain 1/3 of the way from the top of the table's back using #10 3/4 screws and a power screwdriver to drill right into the table backing:

We then cut 2-inch rings from the ends of each sonotube by first marking the cut line with a pencil and tape measure, then carefully slicing through the cardboard with a sharp box cutter.
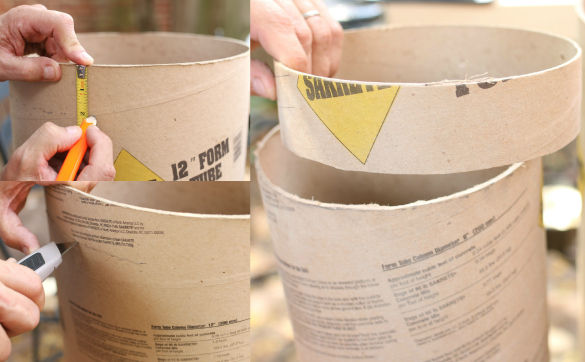
The 2-inch ring size provided that depth we were going for, allowing enough room for shallow plantings, but was also a short enough size as not to overwhelm the final piece.
I smoothed away the rough edges, peeling cardboard and divots in the 2-inch rings leftover from cutting by using a medium to coarse grit sandpaper. Our palm sander came in handy for any tougher to sand areas.

Small plants like succulents are nice low maintenance plants that can thrive in shallow soil and low sunlight with minimal watering — and when it's time to water, a few healthy squirts with a spray bottle will do the trick. That being said, because we'd be filling the tubes with natural materials like soil and small plantings, we wanted to give the cardboard a sturdy, water-resistant exterior — so we opted for liquid rubber.

After laying out a protective barrier (paper grocery bags always do the trick for us) in a well ventilated area, we coated each of the three sonotube rings with the liquid rubber according the package directions. It's very similar to using spray paint — thin and even coats until full coverage is achieved, with dry time between each coat. And yes, we went with the As Seen on TV can.
Once completely coated and dry, we then applied 3-4 even coats of Valspar Stone spray paint, going for a textured, gray stone finish. This stuff was pretty amazing, easy to use and the finish came out identical to the texture and color on the top of the can.

While the stone finish was drying, I went ahead and cut circles from the metal hardware cloth to match the diameter of each sonotube ring — these grids will help keep the soil in place on the finished piece. I found it easiest to use each circle as a template, marking points on the hardware cloth along the top of the circle edge, then snipping the metal at each marked point with a pair of wire cutters.

Tips — cut the hardware cloth right where the metal meets the circle edge. With a slightly wider grid, you'll be able to fit it right into the cardboard ring without the need for adhesive. I also found wearing protective gloves during this step was helpful for gripping the cutters and avoiding getting poked by the sharp metal cuts in the hardware cloth.
Next, I gently pressed and fitted the metal grids into each of the matching sonotube rings. Pressing from the base of the ring through to almost the top edge worked really well. The metal grids fit with just enough tension to hold themselves in place along the cardboard walls — no adhesive needed.

After cleaning and clearing away any debris from the Lack tabletop and base of each cardboard ring, we applied aquarium glue along the base of each ring, one at a time, pressing them into place on the tabletop to form the stacked configuration we'd originally mapped out. Then we weighted them down with a few pieces of scrap lumber to fully dry and adhere before moving onto the next step.


As a first step, we filled each gridded circle with a layer of potting soil that came almost to the top of the metal grid. At this stage, it may seem like there's no way the soil won't fall out once hanging up, but trust us, it works — just keep going!


I freed as much soil from each succulent and small planting as possible to expose the roots in preparation for planting into the grids, then decided on the general placement and configuration for each plant.


Tip — Spreading the moss across the grid and pressing into each opening using a chopstick helped secure everything in place.
Once filled to our desired liking, I gave the entire plant area a healthy misting of water and then we let the garden rest for a day while the plants got used to their new habitat. It's a good idea to let the garden rest, gradually propping it up on an incline over a period of several days as the roots become established.


We decided to hang our new wall garden on the recently exposed brick chimney up in Brandon's room. It's a light-filled space and looks so good up against the raw brick.
From here, we'll continue to mist the plants every so often and watch this little garden of ours grow and evolve throughout the summer.

And since this project is part of a friendly challenge, you can see what each of the other creators came up with using these same materials in this eHow post.
if you like what you see we'd love for you to "vote" for our project by pinning it from the challenge Pinterest board or posting to Instagram with the tags #ProjectThrowdown, @ehow_team and @17apart (so we can follow along). The creator with the most pins/regrams will be the winner and have the opportunity to be featured across eHow.
Discover More:

Beautiful succulent garden! Really love the stone finish on the sonotubes. No one would know that's a sonotube. Fantastic!
ReplyDeleteIt's really beautiful! Do you have any issues with lack of sun? I always have a problem killing indoor succulent planters.
ReplyDeleteAmazing!
ReplyDeleteThat's gorgeous idea! My mother loves succulents and making such a small garden could be a great gift for her. Thank you for sharing. Greets!
ReplyDeleteThis is soo beautiful! Would love to see how it looks now. :)
ReplyDelete