
A couple weekends ago we crossed off some home lighting projects from the old never-ending "things we want to get done around the house" list. The short of these updates is — we switched out the tired chandelier in our bedroom with the ceiling fan in our closet space and gave both fixtures a little updating along the way. Today we're going to share all the details around removing this beauty of an old fixture from our bedroom, how we updated it and where it's now cozily dwelling.
Yeah...I mentioned it was a beauty?
This light fixture came with the house and as you can gather, has seen better days — not to mention it's just not our favorite style and we feel like it was just too small of a fixture for the larger bedroom space. It had a chromey faux finish that looked sponged on (points for creativity!), layers of glass draping crystals and a broken ceiling chain. All of this being said, we lived with it, exactly as pictured, for over a year thinking we'd eventually get to taking care of it — you know how these things go!
In terms of fixtures we wanted for this room, a ceiling fan was ideal. We actually had one in the much smaller room we use as a walk-in closet adjacent to our bedroom that's, as you guessed it, a little too big for that space and rarely used. We realized swapping out the two fixtures with a little updating in-between just might be our golden ticket for getting the look and function we wanted in each room without having to buy new fixtures.
So, last September we decided to get started on the switch...
I'll call this the first phase where we removed and updated the chandelier in our bedroom. The removal was a pretty simple task where Tim powered down the electricity and disconnected the main wiring that powered and held this fixture in place. It's always funny to me seeing the pretty awful looking holes in the ceiling that get covered up with lighting canopies or other decorative barriers:

Once removed we brought this guy outside to see what we could do to breath new life into it. First up, we removed every last string of glass beads, hanging crystals and dusty bulbs to get a better look at the basic shape of the light:


With everything removed, the shape of the light really wasn't bad at all — much cleaner and simpler, so we decided to keep it and work with it. I taped up all of the electrical cords and exposed candlestick outlets, then we gave the entire piece about 3 thin and even coats of Rustoleum's oil-rubbed bronze metallic finish spray paint:


Spray painting a piece like this with so many angles, nooks and crannies required several touch ups and spot shots, but this was the fun part of the project since you see such a dramatic transformation so quickly:

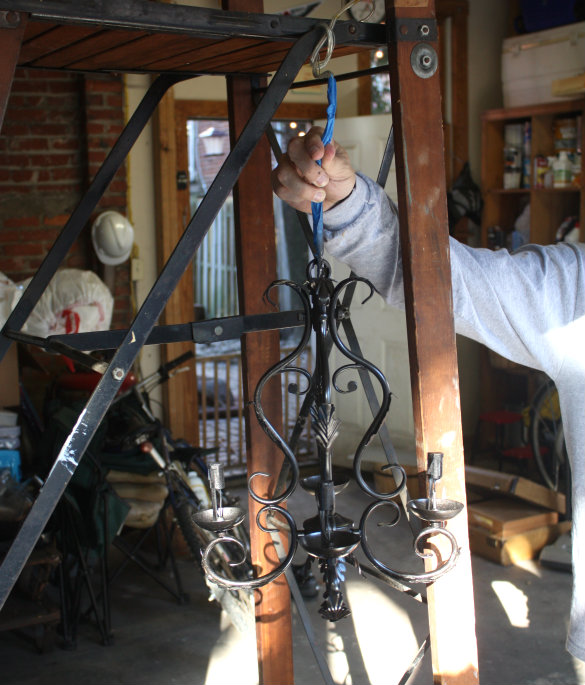
Tim hung the chandelier from the ladder in our garage to completely dry and cure over the next couple of days:
Once complete, we were both happy with the outcome, and just how different the chandelier looked from where we began:

This is the part where I'll admit we left the chandelier in the garage with the best intentions of swapping out the fixtures right away. But those best intentions turned into 9 months before we got our act together and for those wondering, yes, we lived with that crazy ugly hole in our bedroom ceiling for just as long. So that's the end of phase one!
As summer began to creep up on us this year and we once again realized how nice it would be to have a ceiling fan in our bedroom, we pulled it together and made the swap! Enter phase two!

So just as he did with phase one, Tim removed the ceiling fan from the small room adjacent to our bedroom. This fixture had a lot more components, which posed a more challenging removal, but little by little we got it done. Have I mentioned how nice it is to have a husband who worked as an Electrician in a former life?


While all of this was going on, this guy thought it might be a good time for some doggy yoga:

Once every last part of the ceiling fan was removed, Tim pulled down the ceiling medallion to reveal yet another disturbing hole that we vowed to cover back up within the same 24 hours this go round:

I'd brought the painted chandelier upstairs, removed all the tape and pieced all the other components with a new chain together:

Tim re-strung the electrical cord through the new, sturdier chain we'd be hanging from the ceiling:

We ended up buying a new ceiling medallion for this room since the other one went well with the fan we took down (which left us with nothing for this room), plus this more simpler and less ornate medallion allows the decorative lines of the chandelier to shine. You can find these at your local hardware store in various sizes for about $20-$40 and they add some nice interest to the ceiling around a fixture in older homes like ours:

Tim sandwiched all the different pieces together and slowly secured the new fixture into the ceiling:

We opted for new bulbs and found the vintage style filament bulbs we have in other areas of the house (namely here and here) in a candelabra version:

Before turning the electricity back on, Tim screwed each last new bulb in place:

And with that, we could call this part of the fixture swap a done deal! Here's how we ended up in this space:

I think this updated fixture fits so much better in the smaller room:

This room in general is still a bit of a hodgepodge of furniture. We'll eventually paint and bring a little more cohesion to the space, but for now we're enjoying the look of the new fixture. You might also recognize this room as the landing place for that gem of a fireplace cover we scored at a nearby alley sale a couple years back:

The even greater news is, we did end up getting the ceiling fan swapped, updated and installed in our bedroom (no more ugly exposed ceiling hole), so we'll be excited to share the pictures and details here on the blog soon.
Discover More:

I enjoy the way you have presented this great information.
ReplyDeleteIt makes me wonder why I had not thought of it before! Thanks for sharing,