
Today we wanted to give an update on the progress of our locker console project — spoiler alert, it's finished! We just need to snap some final pics of it all set up in the kitchen for a final reveal, but wanted to show you how we finished building out the console first.
For those just tuning in, we're trying to make a console table for our kitchen out of an old army locker we picked up at an alley sale almost a year ago. So far, we've stripped the outer layers of paint off to expose it's industrial awesomeness, sealed it with several coats of lacquer to help protect the outer surface and picked up 2 panels of wood which we stained and sealed for the lower portion of the console.
We left off last with our panels of pine fully stained and waiting of the final coats of polyurethane seal to dry completely. While waiting for everything to dry, we went ahead and picked out the hardware we'd need to build out the rest of the console. Here's that highly technical furniture sketch we drew up as a reminder for how we wanted the final piece to turn out:

The idea is to turn the locker on its side with the door opening down and out like a drawer. We knew we wanted to use steel plumbing pipes and components, along with some heavy duty caster wheels to help give the console an overall industrial vibe as a compliment to the army locker.
We first hit up the plumbing aisle at Lowe's to see if they had what we needed:

They had the 24" by 1/2" round pipes at a reasonable price so we picked up four of those but balked a little at the almost $10 price per floor flange. We needed 8 of them to secure the pipes into the top and bottom wood panels, so shelling out $80 just for the flanges wasn't exactly what we had in mind:

We decided to grab the pipes since they were exactly what we needed and see if we could find the flanges locally or online for a more affordable price. It turns out our inclination was right — we found a set of 5 of these same 1/2" floor flanges for $10 online, here. We snagged 2 sets and did some high fives at how much we saved:

Next up, we hit up Northern Tool + Equipment to take a look at casters. This place has an entire aisle dedicated to casters, so we knew we'd find something we liked:

We ended up getting these 3" swivel steel casters on sale for $5 each:

Once we had all our supplies and the wood was dry, it was time to get building this guy! I decided to start with the casters first since their positioning would need to be more fixed with screws. The floor flanges that would be drilled onto the other side are round so could be rotated to avoid hitting the caster screws in the bottom.

We positioned each caster where we wanted them, marked and punched the holes, then screwed each wheel firmly in place with screws just shy of the wood thickness so they wouldn't poke through:


Once all the casters were securely in place, we flipped over the panel and marveled at it a little before moving on to the next phase. In our minds, it was really starting to come together. Funny how putting casters on anything makes it feel like it's coming together:

Next up, connecting the 2 pine panels with the plumbing pipes and flanges. We screwed each of the 4 pipes into the floor flanges and just as we did with the casters, positioned them in place on the 4 corners of the wood panel where we wanted them:
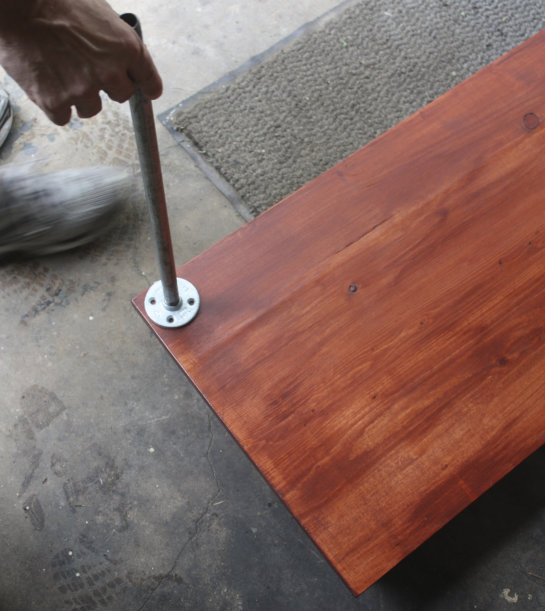

Then it was just a matter of marking, punching and screwing these guys securely in place. You'll notice how we rotated the round flange so the screw holes mapped differently from the caster holes. We screwed the remaining 4 floor flanges on the tops of the pipes at this point so all we'd need to do was flip the entire thing over and screw into the top panel:

Flipping everything over was easier than trying to slide under and screw them in overhead like I was changing the oil on this machine — I'm all about making things easier, folks!

You can really see the beginning structure of the console taking shape here:

Since neither Mary or I have experience in furniture making, we gave each other kudos when we flipped it back over and brought the base of the console inside to the bare kitchen wall:

I think we were both in a little disbelief that we'd actually pulled it off. You can see how just the base structure here could act as functional storage if you wanted to make one like this without the locker to rest on top:

We brought the finished locker inside and rested it perfectly flush on top of the built out base to complete the structure. Here's an idea of what it looked like the minute we brought it inside:

We're pretty excited at how perfectly it works along this wall — it's almost as if it were custom built especially for this space, har har...
Next up, we're eager to share the final pics from this project in all of it's functioning glory. We had a blast filling the locker up with kitchen essentials we've had to keep in the cellar from lack of storage, so as soon as we snap a few pics, we'll share the results here on the blog!
Update: We completed the locker console and love using it in our kitchen! See all the final pics in this project post.

THAT IS TOTALLY AWESOME!!! I'm working on a black cast iron plumbing pipe table with a live edge slab for our office. I'm so worried I'll mess the wood up.
ReplyDeleteAngie please shoot us an email of this we would love to see it when you are done!
DeleteThis looks AMAZING!!!! I'm so beyond impressed (but not surprised).
ReplyDeleteBeautiful !
ReplyDeleteThank you!
Delete