
We decided we'd like to keep them in their natural form and wanted to wall mount them in a small space in our living room that needed a little updating. In order to complete this project we needed to first clean and whiten the skull, affix wiring to the back of it, then place and hang it on the wall.
First we cleaned and essentially bleached the skull to a stark white color. When we first found it, it had debris, dirt, moss, and natural wear from sitting in a ravine for probably close to a year and it had the beginnings of gnaw marks from mice and rabbits seeking minerals (which interestingly is why you do not often stumble across antlers just laying around in the woods).
The end result was pretty awesome in that the skull itself is completely clean and white while the antlers still carry their wear, age, and rustic nature:

Here's how we went about cleaning and bleaching the skull - note this is simply a process that works well for us and doesn't leave any odors throughout the house:
1. Wrap base of antlers or any area of the skull you do not want bleached with foil. We went with the base to get a clean bleached finish on the entire skull yet a natural age and rustic patina throughout the full antlers for a nice contrast.
2. Place base of skull in large pot over stove-top and cover with equal parts hydrogen peroxide & water up to point where your foil begins. The peroxide acts as the bleaching component (notice the green tint on the skull).
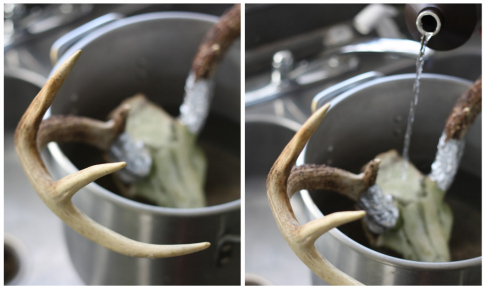
3. At this point, bring liquid to a full boil and allow to boil for an hour and a half (yes, you heard me right - this is a process but it's worth it). Add more equal parts water & peroxide as the liquid mixture evaporates to make sure skull is always covered.
4. Leave skull in boiling liquid until you achieve your desired bleached look. At this point, it's safe to turn off heat and remove the skull (be careful - it's hot). Remove foil, rinse with cold water and wipe down to dry.

5. Let sit to dry completely and you're finished! Repeat the boiling/bleaching process as necessary to reach your desired look.
After cleaning and drying, I threaded simple hanging wire through two perfect holes in the back base of the skull where I wanted to have it hanging from on the wall so the skull would be flush against the wall with the antlers protruding outwards. I simply wire snipped the hanging wire, passed it through the holes, and twisted it several times to form a loop. Tip: make sure to keep your wire loop short enough that it reaches only about halfway to the top of whatever your project might be - this will ensure hiding the wire and wall bracket once hung (otherwise your project will hang too low and you will see all of the hardware above).


Mary and I are thrilled with the outcome. We love the white on white tones of the antlers on the wall and how such a simple addition could create such an instant update to this little slice of our living space.
Our only battle now will be convincing Basil to stop barking and trying to jump up at the new wall decor. He'll stare up at it with a stalking gaze in his eye and I can only think he's got it in his head that one day he will conquer this mounted deer skull. Thank goodness it's just out of his reach and he listens when we tell him to sit.
On a related note, shed antlers of all varieties actually make an incredible dog chew toy. While shopping on Etsy for handmade dog treats and toys after we first brought Basil home, Mary came across the shop, WSPuppyeyes, out of Illinois which specializes in selling antlers as dog toys and the shop owner has fostered over 100 dogs. She'd never heard of such a thing and was intrigued since we're always looking for durable, natural, and healthy dog toys for Basil. We learned deer antlers are essentially nature's chew toys - 100% natural and renewable with a good source of calcium and minerals, non toxic and they don't splinter like hollow weight bearing bones.

She ordered a couple and when they came I kind of laughed at her since I actually had some antlers in the basement from hunting trips in my past. Once we gave Basil the antler, he took to it like no other toy we've given him - we literally swear by these now. I ended up finding one of those other antlers in the basement and he loves this one too - it's actually been one of the only chew toys that has survived the full 9 months we've had him. There is no mess when Basil plays with his antlers and I think he is drawn to the "wild" taste and smell - which deep down makes me happy since I dream of taking him hunting one day.

Long side note short, we think he is obsessed with our newly wall mounted deer skull since he already has a natural affinity for wild deer antlers and was actually the one that first "hunted" down this skull of ours.
So what are your thoughts on hanging animals on your wall? Does the skull and antlers versus a true deer head make a difference or do you just now want to go there at all?

Definitely prefer the skull and antlers versus a deer head! My son cleaned his first buck the same way, although he buried it first, so all the ground creatures would do most of the cleaning....He purchased a mounting system which he placed on a board he painted. Here is a pic
ReplyDeletehttp://www.flickr.com/photos/66279599@N08/
I prefer the simplicity of your mount, but for a 14 yr olds room, this works fine!
Never even thought about antlers as bones...will definitely try it...btw Basil is a beauty!!!
Lisa,
ReplyDeleteLoved the photo - that's pretty high tech! Also like the idea of burying the skull to have it naturally cleaned. Let us know if you try the antler as a bone and how your dog likes it!
Ok, I'm either going to order the antlers or go back to pet shop and get 3 (one for each of our dogs). It certainly makes sense that they would be attracted to them.
ReplyDeleteWe got our dogs to stop barking by using a trick a trainer taught us. I have 3 towels rolled up and bound with rubber bands (for my office, family room and dining area). At first when the dog barks just toss the towel close to the dog, it startles them and at the same time just say "no barking." After a while they get the message. It took about a week of constant reinforcement to get them trained. Now I just have the towel sitting someplace they can see it and they don't bark.
Rose definitely let us know how your dogs like the antlers - you can't go wrong with the ones you choose.
ReplyDeleteI love the trick your trainer used to get your dogs to stop barking, we might have to try that. It's so funny as Basil has bad separation anxiety and we just had a specialized trainer in our home for a consultation - she taught us some similar tricks for when he wants to bolt out the front door. If all of the things she taught us work at the end of our two week training time, I'm sure you'll hear all about it right here on the blog! haha
Wow! What a wonderful idea! I have to say that I love the animal head on the wall like that. It's super cute and chic! Lovely post!
ReplyDeleteCool- I really like. Any suggestions for finding deer skulls?
ReplyDeleteHey mrbazilly!
DeleteLearn more about how we found this one in this post: http://www.17apart.com/2011/08/elements-of-nature.html — Basically, our dog sniffed it out! If you have access to forests where you know deers live and have a dog, a quick walk through the woods might uncover some shed antlers! Good Luck!
We have just acquired a water buffalo skull- do you think that we could just use larger hardware for the piece? or being that it is heavier should we go another route? Looks amazing by the way!
ReplyDeleteHmm...i am not sure of the size of what you have but I would imagine it is quite bigger and I would definitely use larger hardware.
DeleteDo not let dogs chew antlers. They occassionally carry a virus that acts like botulism and kills EVERY time ...my dog died of it...ask a country vet...
ReplyDeleteMy husbands brother gave our son a deer skull with antlers (looks just like the one you have here). I am really wanting to get it bleached so I can hang it in our sons hunting themed room. Thanks for all the tips and details! Not sure what method I'm gonna go with, but this looks like it worked really well for y'all so I'll probably do this!
ReplyDeleteHi:) I have a question. Did you use pure hydrogen peroxide 30% or 10% or was it just hydrogen peroxide solution (as one in first aid kit)? I'm trying to understand it properly cause in english those two names are similiar, but in polish they are completly different :) Anna
ReplyDeleteSorry to pop in like this, but boiling your bones is a BAD idea! It weakens the bone significantly and allows grease to seep into the bone, which can make it look and feel gross. Instead, you should just leave the skull in the peroxide on no heat for anywhere from a day to a week, depending on the color of the bone and what color you'd like it to be. Keep in mind that it will look different wet vs. dry, too! Also, ALWAYS use plastic containers when working with peroxide -- hydrogen peroxide can corrode metal, and can possibly even have some pretty big chemical reactions with certain metals. Plastic litterbox tubs are PERFECT for bones, or any other tupperware container you can find! But processing takes so much longer when you're not boiling, so antlered skulls can be tricky because you can't easily cover the container. This can be dangerous if you have pets who might go snooping around your peroxide setup. You'll want to put the container somewhere where your pet can't get to it; outdoors is ideal to minimize the mess in your house, but that might not always be possible if a dog can get to it somehow.
ReplyDeleteAll of that having been said, this is a pretty cool guide. The zip tie thing is super cool! I've been wondering for ages how the heck to mount a skull like this -- who knew that the solution would be so simple. Congrats on a great bone find; it looks GREAT!
Sincerely, your neighbourhood bone enthusiast.