
This time last month we were celebrating Brandon's college graduation with a party here at home. We hosted an informal backyard BBQ and added DIY decorations to help make the space feel a bit more festive. One of my very favorite touches was the homemade cake topper to help dress up the table.
The project comes together in less than 30 minutes, all for under $10 and made a nice homespun touch for the store-bought cake we'd ordered.

First up, the golden Hooray! We chose letters to spell out something celebratory, but you could create any word, phrase or name by combining different letters and numbers.
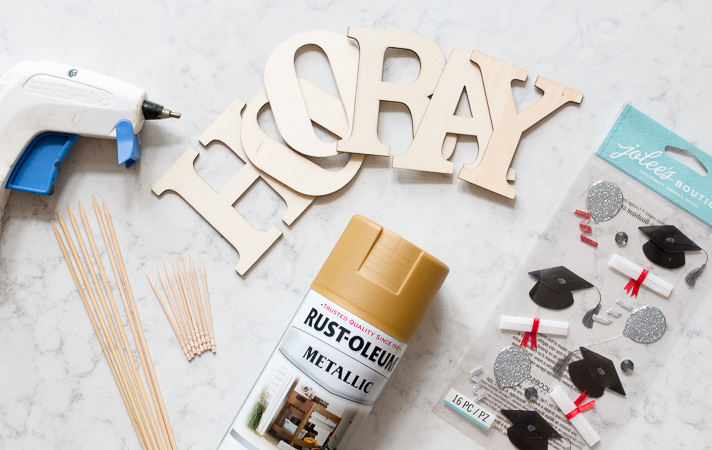
The letters were made from lightweight laser cut wood in a font style we liked. I'd picked them up at our local craft store, but found some nice online versions here, on Etsy and Woodcrafter.com that would work just as well.
Supplies:
- Natural wood letters
- Wood skewers
- Glue gun and glue sticks
- Metallic spray paint

Begin by glueing the flat tip of each skewer to the backing of the letters, one at a time. Allow to fully dry, about 1 minute before picking up or painting.

Outdoors or in a well ventilated area, spray paint in thin layers to completely coat each letter in a shimmery finish. Allow paint to dry for at least 24 hours prior to use. Dip the painted skewer tips into food-safe wax or skip painting them all together if you don't have wax.


I chose a bit of variation in the placement and height of our Hooray by sticking each letter into the cake at different points — some further in then others. It would be just as easy to insert them at an even height.

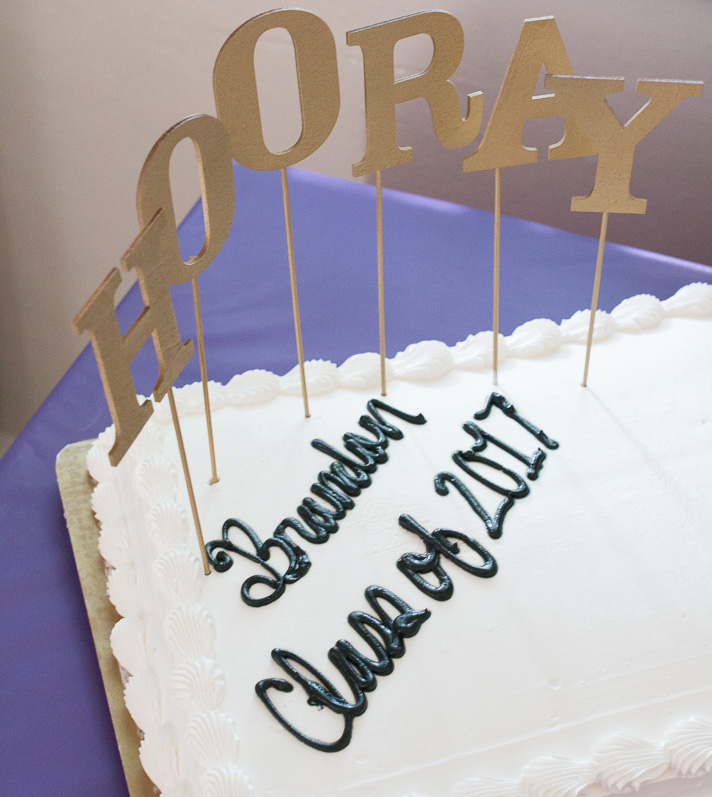
Truth be told, I'd asked for the cake lettering to be on a diagonal in the bottom corner so the toppers would sit behind them (exactly where the lettering is currently pictured), however it was a lesson learned to bring a quick drawing along when ordering something specific next go round. I was bummed out about the placement for a split second, then worked with what we had in the moment — which turned out just fine. In the grand scheme of things, if all I had to worry about that day was the placement of the cake lettering — it's a good life!
To play up the graduation theme, I made a few additional toppers with mini graduation hats and diplomas to layer into the mix:

These little guys may have been one of the quickest, easiest and most satisfying party decorations to make. The big secret? They're stickers with toothpicks adhered to the backs. Seriously.
Leading up to the party, I'd come across a themed pack of graduation stickers at my local craft store on promotion (source online here

Side note: I'll admit that when I came across these stickers in the craft store, my inner 8-year old self had a bit of a fan girl moment. Anyone else out there have a sticker album collection growing up? In our neck of the woods, "puffy" stickers or anything with dimension like these were something mighty special — but I digress...
How cute is the detail and dimension on these little graduation stickers? I just love how charming they are.

Each sticker came with a soft adhesive disc on the underside, just perfect for pressing each skewer or toothpick onto for a strong and immediate hold. I used toothpicks for some and longer skewers for others to give a few options for playing with different heights on the cake.
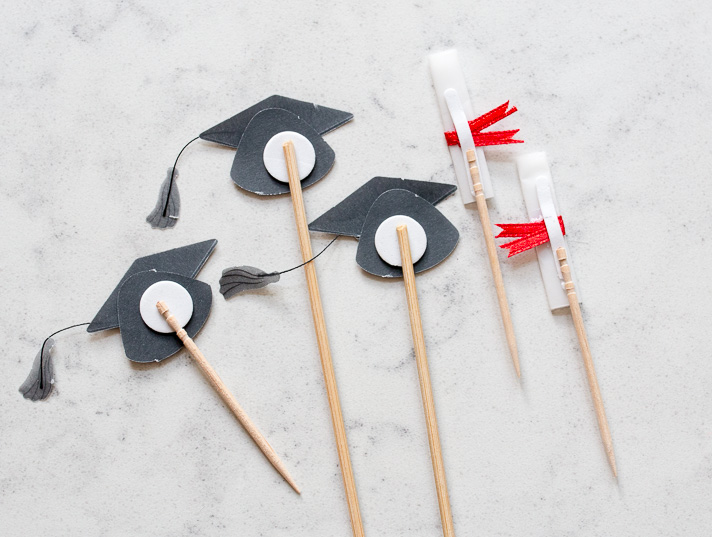
Tip: I knew these would be a single use topper in our case so didn't take it a step further, however this would be a good step in the process to press a small circle or strip of paper over each skewer to cover the exposed adhesive and provide a bit of a backing if you like more of an all around finished look.

You can see how adding in the hats and diplomas really played up the color and tied everything back to the graduation theme. What was once a pretty plain jane store-bought cake quickly transformed into something bright, festive and filled with homespun personality:

Best of all, our man of the hour approved.
Thanks so much for checking in on us today. For even more of the fun, you can catch up on all the party details from Brandon's graduation in this post and find the tutorial for how I made the photo garland pictured on the wall above from his leftover party invitations in this post.
Discover More

Post a Comment