
Here are some various shots of the room from back when we first moved in (and were using the space as an all purpose dumping ground):


We've been wanting to paint this particular room since we moved in — the light purple just wasn't our cup of tea. Tim even prepped the room this past winter by spackling, sanding, and removing all of the switch plates — thinking we'd get to painting it right away:

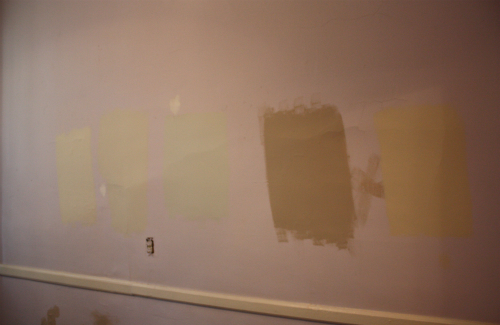
At that same time back in March, we swatched up a paint color we thought would do the trick, but it turned out to be way too dark for the space — so what did we do? Nothing, for over 5 months, haha. It just sat like this with the exposed outlets, open switch plates and spackle.

Well, a couple weekends ago my mom came over for the weekend to help us knock this project off our painting list and once we had everything prepped and had picked the paint colors, the actual painting of the room took less than 24 hours total.
My mom had been planning to come and help us paint this room for over a month and all we had to do was pick out the colors — it wasn't until the night before she arrived that we were finally able to make a decision. Through that point, we had about 5 different swatches up on the wall we'd been ruminating over (including that original one that had been up for over 5 months):
Our dining room sits in the back of our house
and while it has 2 large windows, it's a pretty dark space. We wanted
something that would brighten up the space, but would still be neutral and
somewhat warm. I kept thinking we'd paint the entire room one color and I was leaning more towards the darker gray color in the bunch while Tim was leaning towards the lightest of the colors pictured above on the far left. In a stroke of genius, Tim suggested we use both of the colors since we had the chair railing trim separating the wall in the first place.
We ended up going with Restoration Hardware colors Stone (the darker of the two) and Linen (the lighter of the two) in the "Subtle Velvet" finish, which we think is just a fancy term for "flat." We decided we'd try the darker of the two colors on the bottom of the railing and the lighter above the railing. This way, the lighter color would brighten up the majority of the space and the darker might add a little contrast and warmth. We figured if it went terribly wrong we could always paint back over it.
It was kind of ridiculous how proud we were that we were finally able to make a decision for this room. It's probably the room we've wanted to paint the most out of all of them since moving in, but deciding on those colors was the only thing that kept holding us back.
Once mom arrived on Friday evening, she and I changed into our painting clothes, cracked open a bottle of wine and started trimming out the bottom portion of the room. You might remember that mom and I make a great painting team back from when we painted the garage stairs in my aunt's house in Syracuse.

Mom took on
trimming out the "top and corner" portions of the lower wall while I tackled
the "bottom" part. Before I could get one wall trimmed out, her's looked
like this:


I'll just go with the motto "slow and steady wins the race" — and just kept plugging along on the bottom portions around the room. I've mentioned my little trick for using my old art brushes back from art school when we painted the kitchen — well my trusty old art brushes made another appearance in the dining room when it came to getting into tight corners and around the objects we didn't want to remove from the wall:

After gabbing away and painting together, before we knew it, we had 2 coats of the stone colored paint trimmed out along the lower portion of the wall and it was time for dinner! All this time, Tim had been making dinner while we trimmed out the space — we had it made.


After dinner, mom actually rolled out 2 coats of the stone paint to complete the lower portion of the walls while I began trimming out the upper portion of the space with the lighter, linen colored paint.


And for anyone wondering, don't worry — our "inspector" was there the entire time to ensure we were doing a proper job of things:


The upper portion of the room was a lot larger and required lots of
ladder maneuvering, so we called it a night after a single solid trim
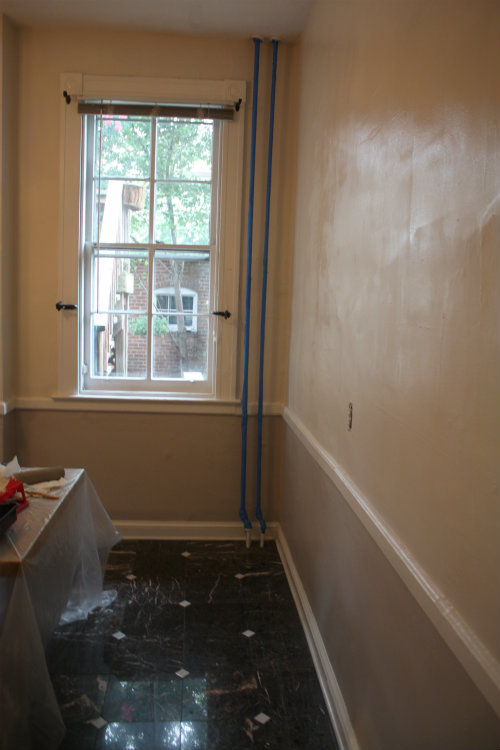
coat. Tim even made an appearance to help cover up all those swatches we'd put up before. No paint visor required when using a brush:

The next morning we got up and got back to it. I trimmed out the second coat of the linen color and then Tim came in to roll this job out:

It's amazing how quickly things visually come together once the paint is rolled on — I just love watching the transformation at this point.

Those blue bars are actually taped up metal pipes that used to be used for the radiators in our house. They aren't functional any longer, but we love the charm they bring to the house so we've kept them in tact. I've mentioned before that I'm not usually one to use painter's tape, but in cases like these, it's so necessary for getting a brush behind there!
Drying time! Almost complete!
Once everything had dried and cured, Tim installed one of our favorite pieces of art onto the center mantle of the wall — our steel deer head from The Steel Fork on Etsy. All of their mounted wall sculptures are made from recycled farm machinery, and we just love it. The deer head really creates a statement focal piece in this still pretty bare room.


To give you a better idea of what the colors look like in natural light, here are some progress shots from right when after the paint dried that day since it tended to read rather "yellowy" instead of "lineny" in the painting shots.
View from our mudroom into the back dining room:

Corner of the dining room looking back into the mudroom:

Closer view from walking into the dining from the front of the house:

Tim removed the previous mini blinds and hardware from each of the windows and we took down the former drapery to experiment with something a little different. Here we are prepped to put up new drapes and replace the recepticals and switch plates throughout the room:

This is pretty much how we are looking these days. We've got a ways to go in this room, but we still think we've made great progress from where we started. We're loving the visual separation of the wall with the two different colors and without realizing it, love the way the bottom grey tone blends into the grey color we chose for the hallway nook and area rooms around it.
We'll be sure to keep you posted as we add new linens and details to this room — not to mention when we finally get real dining room chairs, more furniture, a rug, wall hangings and update the lighting. Lot's to do, but we're having fun taking it step by step and are looking forward to when we can really entertain in this space.

looks great, love that table
ReplyDeleteThanks Shannon — it's one of our favorite pieces of furniture too!
DeleteThat is really a nice color combination. When I moved in here that same shade of light purple was in the tiny master bedroom, ick. I'm going to remember that color combo as it really is nice. Leaving the pipes did make me roll my eyes but I'm sure you have good taste and it will be wonderful!
ReplyDeleteThanks so much Karen! Those pipes are white under that blue tape so they match pretty well — we'll try to get better pics as this room evolves!
DeleteSo that's the secret...wine with paint!!! Your mom is just like my husband, its a breeze for him & I struggle & do a lousy job!! BTW - what's her tip for sitting on the ground cross legged! I couldn't get back up! Love the deer. Bow season is Oct. 1st in Illinois, are you ready Tim?
ReplyDeleteLisa, YES! Wine with paint is the way to go.
DeleteI definitely love the color choice and I love your faux taxidermy! I'm actually working on a faux giraffe head to hang in our apartment. Not at all as fancy as yours but, I love the weird charm it brings!
ReplyDeleteOh awesome! Can't wait to see the giraffe head Jasanna!
DeleteLooks so good! Love the two tones... much better than the purple :)
ReplyDeleteHonored. Thanks so much for choosing to hang our deer head in this fabulous space. I loved reading about your painting process. It looks like you made fabulous decision - and came to a consensus no less. Well done. I'm sure the deer head feels quite pleased to be hanging there & probably very relieved to have left the dust and dirt of our shop. Thanks again! Enjoy. Enjoy.
ReplyDeleteWe LOVE the deer head — it's one of our most prized possessions! Looking forward to showing more of it as this room evolves.
DeleteThe two neutral tones are much, much better than the purple! I found this image on Pinterest on how to keep a space big and bright when you're rehanging drapes I thought you might find useful: http://pinterest.com/pin/101682904057838854/
ReplyDeleteAnnabel — just what we needed!! Thank you!
DeleteThat deer!! So fantastic!
ReplyDelete