
When Mary brought this little industrial stool back from her grandmother's house a few weeks back, I had an immediate vision for it:

Let's face it, we're both suckers for stools — we have quite the growing collection. Mary thought I might go for the completely industrial vibe it had with a little cleanup, but I had a whole new look in mind and began planning how I'd transform this tired little stool into the bad looking "man stool" I just knew it had the potential for.
I couldn't wait to start cleaning it up, breaking it down, and get started on this project. So to get things started, I wiped everything down really well — there were spiderwebs and I think some egg sacks under there, people!

After a good wipe down, I broke the entire stool down to each of it's basic parts to get a better feel for what I'd be working with.
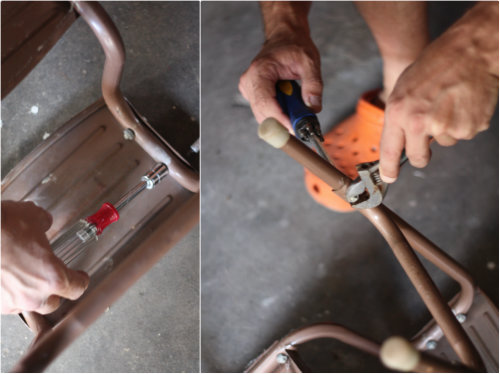
As I unscrewed each piece, I knew I'd want to even update the screws to something a little more modern. Once everything was disassembled and laid out, I had a better idea of how to prep and update each component.

There was some rust and wear from years of good use — so I started out by lightly sanding each piece, especially the rustier ones to not only try to eliminate some of the current corrosion, but provide enough "roughness" for the primer and paint I had in mind.

Next up, primer! I rigged up what I like to call a state of the art painting station that consisted of unwound coat-hangers I bent into hooks that could hang from a tree branch in our back patio area and suspend each piece of the stool for easy "all around" spraying action. I'm telling you, it was a fancy setup.


I went with RustOleum Professional Fast Drying Primer to get a good base on the metal pieces of the stool, help stop and prevent any further rust, and protect against any future elements.

Thin and even coats are the way to go. After a thick coat and dry with the primer, it was time to get started with the real transformation — red and black spray paint. I went with Valspar Max Anti-Rust sprays to (as you could probably guess) prevent further rusting:

Again, with several thin and even coats, this little stool was taking on a new life in no time.


I let each component thoroughly dry and cure overnight before piecing each part back together.
I mentioned wanting to update with new hardware — check it out:


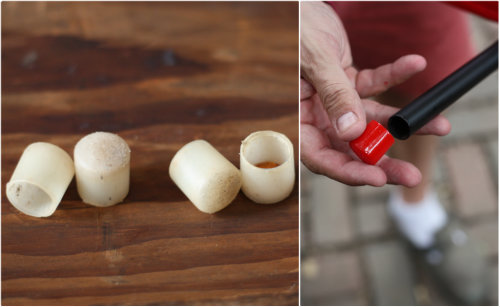
Makes a big difference, doesn't it? As always, one of my favorite tips for replacing old hardware is to literally take the older piece you need to update with you to the hardware store (or take a picture if it's too big). This way, you can see firsthand if what you are buying will be a good fit or not. I'm all about only making one trip to the store when possible.
Oh, and I also decided to spray the end caps a bright red to match the steps on the stool and balance the whole look.
Once it was all said and done, we looked a little something like this:


We're both loving the look of the new stool and it's definitely a full transformation from what we started with. Right now we're keeping it inside and still trying to settle on the perfect place to keep it — but we think Granny would be proud (even though she might have asked for a different color combo).
And for fun, let's take another look at the "Before & Afters:"


Isn't it amazing what a few coats of spray paint can do? Have you made any small updates that have packed a big punch or completely transformed the look of a piece of furniture or a space where you live?

Incredible do over! I wish I had vision for objects like you do. I feel like I could dump a bunch of my old stuff in your yard and you would be able to make it beautiful. Be glad I don't have your address. :)
ReplyDeleteHaha Shannon you are welcome anytime!
DeleteOh my kitchen colors are red, gray, black and white. So of course I just think this stool is the cutest makeover ever. Makes me want to go paint something. :)
ReplyDeleteThanks Karen!
DeleteOMG ! Is there anything this man can not do ???? He did a great job on this.....looks like he went to a lot of trouble too.....I would have just maybe sanded it and then paint it without taking it apart lol.....I would not have thought to take it all apart and do what all he did.....even bought new screws and caps for the legs.....wow ! what a man.....I say he's a KEEPER......better hang on to him :)
ReplyDeleteToo funny! Thanks so much. I often wonder if there is anything Tim can't do too. Definitely a keeper!
DeleteThis is so awesome, I don't think I'd want to put my shoes on it at all! Great job! And no, have not transformed anything lately, other than my pine tree and camelia bush! - Kaye
ReplyDeleteThanks so much!
Delete