
As promised (and drug out...), today we're excited to show off the final results of our kitchen, back hallway nook and downstairs bathroom painting project. Catch up on all details for how we decided on what color gray paint was our perfect shade, how we prepped the three rooms for painting and how we decided to go all out and paint 2 entire walls in black chalkboard paint.
So let's get on with it shall we? Here's what our kitchen currently looks like with the freshly painted gray walls and chalkboard paint accent wall above the cabinets (see the before shots in this post):


Here's a look at the final result of painting the same shade of gray and chalkboard accent wall in the little hallway behind our kitchen (see the before shots in this post):


Side note:
The back room is still painted in our favorite shade of purple that
this little hallway was. We're hoping to take on painting that room
next, but for now it might reflect a little purple-ish tint into the hallway.
Our downstairs bathroom, which is connected right off that little hallway used to have baby blue colored walls — we were so happy to update the feel of the space with the fresh gray color. Here's the end result and what this space currently looks like (see the before shots in this post):


We ended up moving that big framed Richmond map advertisement into the bathroom from the kitchen for the time being since it filled up the wall space pretty well. We also swapped in a bigger mirror than the little one we tossed up on the wall as a place marker when first moving in. We're not sold that this mirror will be the final choice for this room (since the gold clashes with the chrome finished hardware throughout the rest of this room), but it looks better than what we had and we tried to tie the gold-ish frame color to the gold frame color of the smaller stand mirror on that little antique dental cart we have in the corner of this room.
So, you've had a look at all three rooms with their new paint makeover separately, but our main goal in this undertaking was to try to visually tie these three separate spaces into the feeling of one bigger area — how about we take a tour showing how we tried to tie them all together?
Yes, let's get on that...
If you walk into our home from the front door, this is how you will first see the kitchen from our living room. Note how you can see all the way to the back of the house, with that little middle hallway connecting the kitchen and back of the house — now that the kitchen walls match the walls in this little hallway nook, we feel like the spaces tie together much more cohesively:

Here's a closer look at the same passageway:

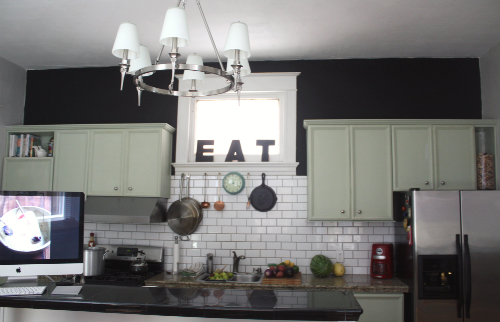
Now, if you look into the kitchen from the same spot in the living room but turned slightly left, you'll get a much fuller view of the kitchen wall that holds the majority of our appliances and cabinets:

This is the accent wall where we decided to paint the chalkboard paint — we love the way it pops off the wall and interacts with the other shades of gray, white and black throughout the space.
After seeing how the little hallway nook and kitchen tie together with the same gray color, you'll hopefully see how they tie together even more with both of their upper walls painted in the black chalkboard paint. Here's a couple views of how these rooms look transitioning into one another:


And last but not least, the first black door you see off the little hallway nook leads into our downstairs half bathroom, which we painted the same shade of gray as the kitchen and hallway — no chalkboard walls in the bathroom though (boo...):

Here's the view looking back out into the hallway nook from the bathroom. While there's no chalkboard walls in this bathroom, the painted black radiator, black & white checkered tile floor and black & white dental cabinet again tie all the other shades of gray, white and black throughout the space together:

We're pretty smitten with the final results of both the fresh gray paint and the chalkboard paint accent walls to say the least. While we're not done on the decorating side of things, we feel like this project has really laid out the foundation for the other things we want to do — like chalk drawings on those chalkboard walls!
For anyone who didn't get a chance to click back to the prep posts and wants a look at what these three rooms looked like before we painted, take a look:
Kitchen Before:

Kitchen After:
Bathroom Before:

Hallway Nook Before:

For anyone who didn't get a chance to click back to the prep posts and wants a look at what these three rooms looked like before we painted, take a look:
Kitchen Before:
Kitchen After:
Bathroom Before:
Bathroom After:
Hallway Nook Before:
Hallway Nook After:
Thanks for following along as we've started to pull these three rooms together. Once we've relaxed from painting a little we'd like to tackle painting the back dining room and middle living areas of the downstairs — we'll be sure to keep you posted.

LOVE it! Your kitchen looks so good! Chalkboard paint is a great accent above your cabinets, and I love the pastel green cabinets, by the way... And the cute little cart by the windows :) Adorable, love the gray in the rest of the house; it's definitely my favorite color for interiors! Great job!
ReplyDeleteThanks Lauren, that means so much coming from you! That cart was one of our favorite and best antique finds to date — maybe a post is in order for it!
DeleteI LOVE it! The color compliments the wood floors in kitchen so well. And the chalkboard paint is so darn cool! I can't wait to see what you draw/write all over it.
ReplyDeleteThe entire thing looks fantastic and I like the map in the bathroom too. That is a very neat feature.
Thanks so much Angie!! We are still just loving being in these spaces with the updates.
DeleteMy dear departed father had a saying that meant top of the mushroom in Canadian--DELICHMO! a perfect synergy!
ReplyDeleteLove it Brian — thanks so much!
DeleteNice, personally i would like to see a little more bold color to make it pop
ReplyDeleteThanks so much! The color is super light, you are right! We are loving it for now but who knows what might happen down the road if we decided to change it up!
DeleteLight colors brings light ideas :)
ReplyDeleteLove it
Hi, I just found your blog while searching for gray paint colors. I was wondering what the name of the paint you chose in the kitchen was. I love the chalkboard walls! Your kitchen looks amazing!
ReplyDeleteSo nice to meet you Julie! Thanks so much for the compliments — the gray paint color we used here was called "ash" from the Restoration Hardware collection. Find it here: http://www.restorationhardware.com/catalog/product/product.jsp?productId=prod1361022&categoryId=cat1017001
DeleteLet us know how it turns out if you give it a go!
What color is your trim? It looks kind of creamy white. I'm wanting to paint my old farmhouse walls a pale grey like the ash you used. All my trim (and there's a TON) is a very creamy white.. Which I prefer to stark white. It looks like yours is creamy as well and it looks so lovely.
ReplyDeleteWhat color is your trim? It looks creamy rather than stark white. I've been wanting to change my latte colored walls in my old farmhouse to a pale grey similar to the ash you used. I have a TON of trim that is all a very creamy white as opposed to stark white. A lot of ppl have said that it won't look good with grey. I disagree.. I think it will be warm and cozy.. As long as they're similar tones. But.. I'm still a lil weary to pull the trigger and then end up having to re-paint 3000sf of trim. I guess you live and learn, right? :) beautiful job your home is so lovely and inspiring.
ReplyDeleteI clicked the "help us choose our gray" link that you posted and read through it as well as this article but cannot find the name of the actual paint that you decided to do with :( Am I COMPLETELY missing it?? Im in the throws of a full blown "it-was-gray-on-the-paintchip" nightmare and need help!
ReplyDeleteThanks so much
Did you actually use RH ash or did you do a color match. If the latter, what make? Also would love to know what white yiy ended up using for trim. Thanks!
ReplyDeleteHi, we did use RH paint as mentioned in the post. At the current time we have left the trim as you see it in the photos but we did just start paining trim in the house and we colored matched the original using Lowes Valspar paint. Hope this helps!
DeleteBest, Tim and Mary