
You might remember, we'd actually transplanted this rosemary plant into a container when we uprooted it and brought it over from our previous home this time last year. Since it's had almost a year to get established in the container, we thought it would be fun to see if we could multiply the plant with cuttings.

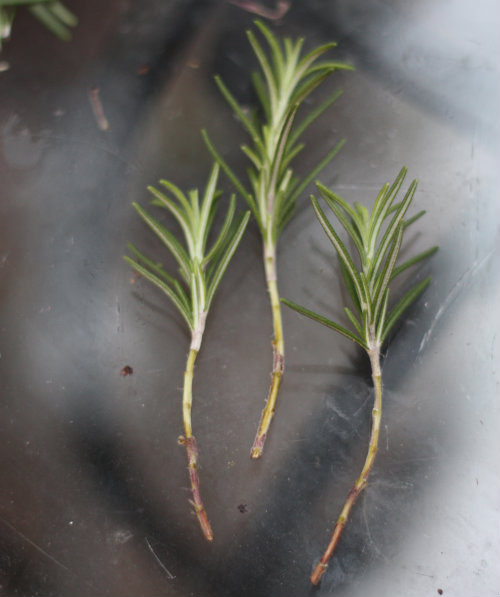
As with the mint, we took about 2-3 inch cuttings from the tops of the rosemary stalks where new growth was happening. To get a cutting, you just snip right off the plant. You want to try for the newer green growth since it's still in the growth stages and has a less woody stem — the chances for getting roots are evidently much higher and the time for getting them should be shorter than with the woodier part of the stems.
Gently pull and strip away the leaves on the stem, leaving a few at the top. Leaving only a few leaves at the top of the cutting allows the stem more energy to focus on new root growth instead of feeding so many leaves on the stem.
You can even gently scrape the outer layer of the stems with your fingernail to promote root growth even further. With propagation, the new roots will eventually sprout out from these leaf nodes in the stem you've just stripped away.
Place new stem cuttings in container of water and let them sit and get cozy in their new home.


Keep the water covering the leaf nodes on the stem and below the leaves. Refresh water in container every few days and rinse stems with each refresh. Here's how we started out back in the very beginning of January:

8 days later, not much had changed at all, except for a little fuzzy growth we'd need to rinse off the stems:

An entire month after that, we still weren't sprouting any roots, but you'll notice that new bright green growth was taking place on the tops of the cuttings — so we hung in there to see what would happen:

2 months after we took the cuttings, March 1st, still no roots:

Then, almost like magic, we came downstairs on March 6th to find this little gem had sprouted overnight:

We ended up waiting another 10 days after the initial root sprouted before transferring it to a soil filled container in order to allow it to get stronger. Roots grown in water tend to be weaker that those that take shape first in soil:

What's even more exciting and pretty ironic about our progress with rosemary propagation, was how we were able to successfully propagate a huge bunch of rosemary stalks on the other side of the kitchen without even realizing it.
After a meeting for the Richmond Food Co-op at the William Byrd Community House in mid February, I'd brought home a large bunch of local rosemary stalks from the gardener at the Byrd House Market. I always like to keep fresh cut herbs from the store or market in a container of water by the kitchen sink to help prolong their freshness as long as possible (great for herbs like cilantro and parsely).

Since it was such a large bunch of rosemary, we didn't use the bulk of it right away, so it sat for a few weeks and stayed alive while we used what we needed here and there in recipes. After a few more weeks, we actually saw new growth on the tips of these rosemary stalks and when I pulled them up from the container to change their water, we realized there were roots growing from the bottom of these stalks!

We weren't even trying with these guys and they seemed to propagate quicker than our others in the windowsill — they hadn't been stripped of their leaves or refreshed nearly as much as our other smaller cuttings. It may have been that they were cut from a more established plant at a later time in the season with new growth, or it may have been that we kept them in a closed (not clear) container and away from the direct windowsill. Whatever the case may be, we were blown away.
Over the weekend, we finally got a chance to transplant our rosemary cuttings in their own soil filled containers, in hopes they will continue to grow established roots and take off in their new homes.

We layered the bottoms of the planters with drainage rocks, filled them up with gardening soil and gently planted the small cutting we'd rooted in the windowsill:


Then we decided we'd take a chance and plant the larger stalks in bigger planters just to see what happens — we've really got nothing to lose, so we're giving it a shot!

Only one tragedy came out of this project and that's when I accidentally knocked over this pitcher Mary hand-painted on a trip to Mexico:

We do have another similar pitcher from the same trip and might be able to mend the pieces of this one, but it something we had to document since Mary's usually the one prone to knocking things over between the two of us!
There were also several stalks from that larger bunch that didn't root. Instead of pitching these in the compost bin, I nestled them in the soil next to our garage in our back alley just to see anything happens there. If worse comes to worst, they will just provide a natural compost in that area, but who knows, maybe we'll have another little rosemary patch take off here too.

We've taken all the planters inside, given them a healthy watering and are letting them hang out in our kitchen windowsill area for a few days before moving them around the house.

We're looking forward to having them as perennial house plants we can chop bits and pieces from as we need them for recipes — hopefully we'll be able to keep them alive!
Have you had success propagating herbs or other plants? Do you root them in water or get them to root straight in the soil? Propagating is still new to us, so we're curious what's been working for everyone else!
Discover More:

Rosemary is my favorite herb and so easy to propagate. Your plants are beautiful. We actually have a 4 foot bush right outside the back door.
ReplyDeleteWhen the little blue flowers appear, they are delicious in shortbread. You can even candy them with a little egg white and sifting sugar.
I have never propagated rosemary before. I have heard that a simple to propagate plant, like ivy, will release rooting hormone into the water and make other cuttings root faster.
ReplyDeleterosemary cuttings usually need aprox. 2 weeks to produce roots and the rooting process requires that the water in the glass used for stem cuttings will have to be changed every other day; so if you mix the water with hormone, how can you change the water? will you continue to mix the new water with hormone again or what?
DeleteYes, rosemary rooting in water is something I've tried with success, too. Your photo documentary of the process is lovely. I just separated a bunch of chives for the first time. My variegated chives were easy - they just came apart. The "regular" green chives were tougher. I trimmed back all the green hoping the roots would be able to recover from the trauma. Most of them are doing well but I've lost one or two. Have you propagated any other herbs?
ReplyDeleteMy Filipina daughter-in-law bought a small chive plant and then separated the roots out and planted it in a row in her garden-- I'd never seen such a thing before... the next year she did the same... they have tons of chives now... I suggested she might want to sell some to a local health food store (she grows organically).
Deletecut chives into tiny pieces they freeze beautifully in little baggies
DeleteLoving your tutorials on propagating various herbs and veggies. I'm so ready for spring gardening!
ReplyDeleteI was wondering why you used a clear glass rather than keeping the stems dark?
ReplyDeletesomeone told me once that the 'fuzz' you were rinsing off the stems is really a very fine 'pre-root hair' that signals the plant is gearing up to put out real roots. If you don't disturb it you will probably get quicker rooting next time.
ReplyDeleteanother mary
That was certainly true when I tried using this method - the first stem to root was the one with the most fuzz! Perhaps the reason it took so long for the first root to appear here was because of the constant washing?
DeleteAfter reading this I took some cuttings off of my greek oregano and put them in a clear glass as well...as is. I didn't take any leaves off or do anything at all to them beyond cutting them. I changed the water out every other day sometimes every day when it was very late at night. Just to avoid forgetting to change the water. I have two very young little girls, I often forget little things I need to do! Well on the fifth day I noticed 3 of my ten cuttings have roots developing already. Pretty cool.
ReplyDeleteI love your projects and your experiments, I'm trying out some of it my self.
ReplyDeleteYour problem with the rooting can be because some plants do not like light when rooting. I cant tell you wich, I just remember my mother talking about it to me, some years ago.
Why dont you just try both every time you reroot plants, I think I will, as you have just inspired med to make more herb plants :o)
Best wishes from DK
Oh and I forgot to tell you, that many tree-like-stemmed plants, you can just put in a pot with soil, but not in the middle of the pot, put it right at the edge of the pot. For some reason they dot like to much space, and this way they will grow roots much faster than in the middle of the pot.
DeleteHope you understand what I mean, english is not my first language... ;o)
This was all so helpful, I'm new to planting and gardening, but somehow I planted Rosemary last year in a small pot and I forgot about it.... then it came back last summer (although it looks pretty shabby now) so I've brought it inside and bought it a brother (basil) and a sister (parsley) to keep it company in my windowsill. I am going to try this clipping project with all 3 in my kitchen so my 6 year old can watch!.... Dark cup, clean water about every 7 days and plant when I see roots right?
ReplyDeleteThanks! Amanda
I actually followed what you did and achieved success in say about 2 weeks. There was only one difference, that is, I put the glass of water with rosemary cuttings by the window in the daytime and when it was dark, I put it in a small cupboard with no air ventilation at all. I am not sure if this has helped the roots emerge faster or I am just a lucky guy. Anyway, I want to continue to grow rosemary in water. Can anyone tell me if this is going to be any success? Why just having to transplant the new plants with roots produced in water to a soil
ReplyDeleteenvironment?
Best regards
Lachimnew
I was given a rosemary sprig in a cup of soil, would it root this way?
ReplyDeleteI decided to go ahead and do what you did to the top of it, just in case while it was still healthy. Just want opinions.
Thank you!
http://sincerelymealways.blogspot.com
I have tried and been successful with root growth of herb cuttings placed in a container of water. I don't change the water. I just add some more when needed. The ware turns green but I just let it be. When its time to transfer in pots, I use that same water to moist the dirt, which I think makes the plant 'at home' in its new potted container.
ReplyDeleteI am pretty sure it has to do with the time of year. Things will grow roots quicker if they think it's spring or summer. They need the time of "winter" rest. So the ones you started first started growing roots in late Feb/March, and the other ones you started in Feb. so they already had a time of rest from growing. I have tried MNAY times starting to root things too late in the fall, and they don't root. Start them in the summer, and they do! Just my thoughts....
ReplyDeleteI use a rooting solution and rockwool and i generally see roots in about 7-10days. Their kept under 24hour light in a hemadome
ReplyDeleteI wanted to add a tip that I used and it worked! I never have seen this technique used anywhere else, but I thought since you had a whole page dedicated to rosemary that I would throw this in.... repost as you wish!
ReplyDeleteI snipped a bit of the top off my rosemary bush, I used it to cover the tips of my datil peppers I have growing. I had a really bad, little black bug problem eating my peppers. After I use the rosemary tip (almost like a star when still connected) on the tops of the peppers the next day there were no bugs and still today no bugs.......AMAZING a natural pesticide!!! JMH@juliemholland.com
i am rooting one tiny rosemary sprig now. i had heard that willow trees are high in that rooting hormone, and crushing a tiny twig or two and letting it steep in water for a couple days will help anything take root. thanks for sharing all your pictures and experience! am leaving my fuzz on the stem, and will try to let you know!
ReplyDeleteI found that a ficus is also very quick to root in its own hormones... maybe it would act like a hormone solution for other clippings as well?
DeleteI love that photos and the step by step instructions. Thank you. I want to propagate my plants to sell at our local Farmers Market.
ReplyDeleteDo you sell you herbs?
Andrea in Big Pine, CA
Thank You for sharing this. I have tried before but I was impatient, now that I have seen it takes a good long while for the Rosemary to show signs of growth. I will cross my fingers in hopes it works for me as well.
ReplyDeleteI have been growing Rosemary for many years and find that it is the only plant that I have nearly 100% success propagating.
ReplyDeleteI always propagate my Rosemary by placeing the tip cutting,minus bottom leaved right into a small pot of soil. If you have no hormone rooting powder you can dip the end of your cutting into honey. Make a hole in the soil with a pencil and pop in the cutting without damaging the end.
ReplyDeleteits nice to see the sprouted rosemery, but 2 months are a long time to for them. If you sow the seed then it will be much earlier time for them to come and replanted. Its my opinion. Thanks for this knowledgeable article otherwise i have never know about this technique.
ReplyDeleteHaving read everything above, I trimmed off a few fresh sprigs, peeled off the lower leaves with my thumbnail, put them in fresh well water in a green glass container. Will refresh every few days while they sit in indirect light. I had originally thought to up-root the plant and take a piece of root stock, but I'm glad I didn't since nobody suggested major surgery on a healthy plant. I'll see what happens, and thanks for all the ideas.
ReplyDeleteI have been patiently waiting for a month and a half. I feel like there will be no root whatsoever. I will wait little more but it will be planted in soil. Good experimenting though for sure.
ReplyDeleteI plopped my cuttings in a mini mason jar of water, I only changed the water once when it got low, but two weeks later my babies have grown quite a few really long roots! I'm plotting them today. Thank you for the great tips!
ReplyDeleteOh, the article is excellent...gave me all the details i need it and also pictures.thank you!!! Now back to work...see you after few months with new baby rosemary.
ReplyDeleteSomeone suggested to me that you can place the sprig in sand and it will grow.
ReplyDelete