
While on the subject of progress reports, we've made a few updates to the little entryway gallery we put together back in the beginning of June. To jog your memory, here's how we left off...
The collection of frames in this entryway nook have done a great job of defining this little space — but the configuration also allowed for room to grow, which is what we've been letting it do as we add picture additions over time:

Over the past couple months, as we came across some more black and white frames, and finally got around to getting some new photos in them to hang on the wall in this growing little collection.
Here's the breakdown of the new additions:

We finally framed our favorite photo from the photo booth in the Etsy offices — having a photo of us together seems to help tie the rest of the family photos together. Plus, we just love this shot of us and now we get to look at it on a daily basis.

We had the above 8x10 shot of Brandon & Stephanie made at Thanksgiving time back when we first got Basil along with many smaller versions and sent it out with our holiday cards that year. It lived in this frame in our other house and we thought it would fit right in here — adding a little bit of Basil into the mix never hurts in our household!

The two photos above we've had for a long while! The one of the kids at the top was from about 5-6 years ago at the river down near our old house. I've always loved this shot since they are wearing knitted scarves back from when knitting big chunky scarves was my favorite thing to do.
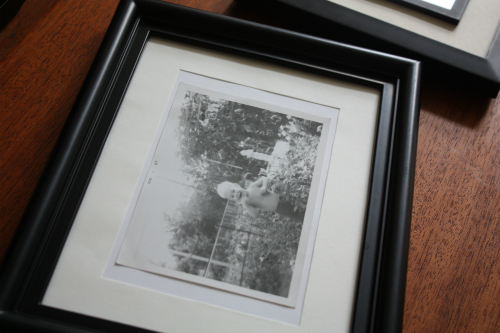
The shot below that is of Tim, which you might be familiar with from this post. It's the original of him as a small child, excited to be in the middle of his Hungarian grandmother's backyard garden. Some things never change no matter how old we get, huh?
If you're interested, you can read up on the backgrounds of all the other shots in this post.
Antique photo prints are usually in special sizes outside of the typical framing options you can buy off the shelf today. Until we decide to get some of these photos professionally framed, I like to use a little hack to get them into the standardized frames:

I basically just fold up a piece of white computer paper to fit within the confines of the frame between the white matting and glass, then use double sided tape to secure the matting in place on the white paper. Then, I literally just place a small amount of double sided tape on the back of the photo and center it onto the framed white paper.

Put your photo/paper sandwich behind the glass and secure the frame backing, then make sure everything is somewhat centered and you're good to go. I like doing this becuase it gives a little bit of a 3-D effect to the old photo in the center since you can see the edges slightly pulling up.
I previously used this same method with another antique photo in this entry gallery of my grandparents:

Sometimes you can just make what you have work with a little creativity and testing (other times it can go terribly wrong).
It's been fun to watch this little growing entryway collection and think about how it might evolve over time. We like that while the photos range in date, and color that the black borders of the various frames act as the thread to tie everything together in this space.

Once we paint this area in the front of the house, we might just decide to take everything down and reconfigure.
Made any fast and fun little home updates lately?

Thank you for that matting tip! I have lots of antique photos that I've been trying to frame!
ReplyDeleteSo glad it was helpful — definitely a little hack that's been useful for us!
Delete