Shop this post:

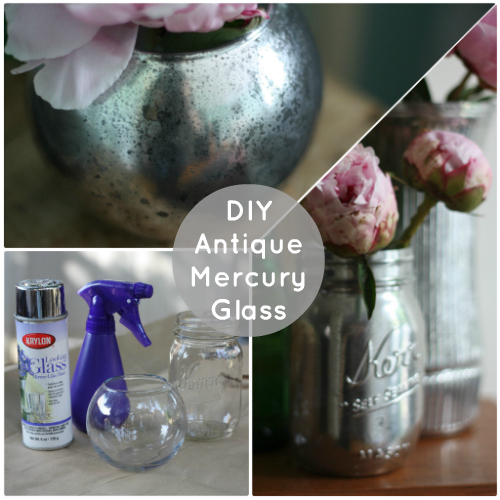
Today we're excited to to share this simple and affordable method for transforming any piece of glass into a beautiful decor update with an antiqued mercury glass style finish — it's amazing.
I've been eyeing lots of different decor accessories in the style of antique mercury glass as of late — this trend seems to be everywhere and I have to admit I've gotten a little sucked into the idea of a mirrored glass bedside lamp or even a bedside table. Given the fact I'm the only one in this household with this opinion, I've decided to get my feet wet slowly and figured out how to achieve the antiqued mercury glass look in a completely DIY method with smaller glass accessories I already had lying around the house.
Here's what I was working with —a glass mason jar, milk bottle, ridged flower vase and a smaller round votive type candle holder. They were all things I either had in hiding down in the cellar or headed for the recycle bin, so I figured I had little to nothing to lose in the event things went horribly wrong, haha.
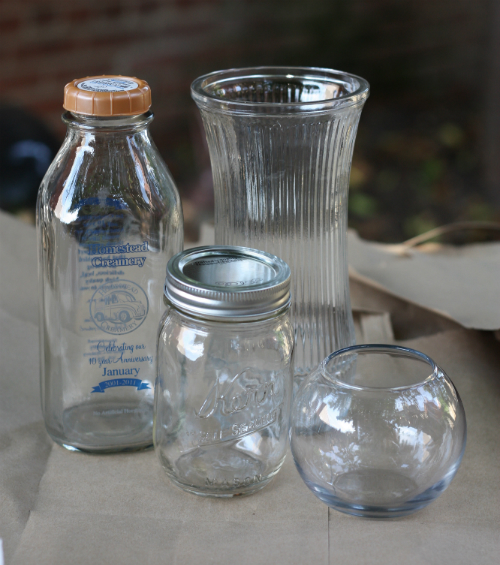
What I really liked about experimenting with all these different shapes and textures was the ability to test the finish on a smaller scale so I'd be able to imagine different possibilities as I come across glass pieces in the future on a larger scale (like that clear glass lamp just waiting for me to find it).
Back in the day, real mercury glass was used a decor accents and was an affordable option to it's silver decor counterparts — today we'll be making the affordable version of this original hack (kinda funny, right?).
Materials:
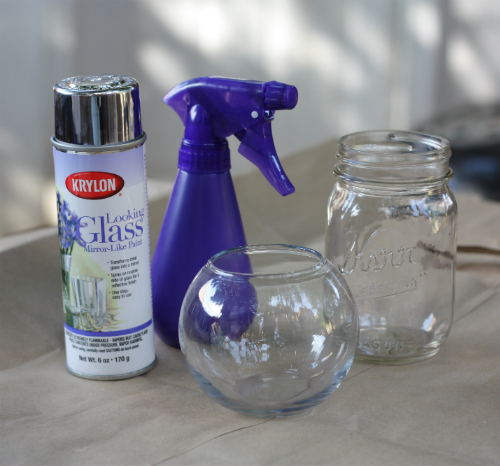
- Various glass containers (must be glass, I used all clear versions).
- Spray bottle
- Water
- White vinegar
- Krylon looking glass spray
- Paper towels
- Newspaper or other protective covering
The one catch to this tutorial is the fact that you'll really need to look for the specific Krylon looking glass spray. I was able to find it in more than one of our local craft stores, but if you are at a loss, you can find it online. While I haven't actually tried any other sprays, I did read in a few other Pinterest tutorials from people that did who wish in retrospect they had gone with the Krylon looking glass spray (just tyring to save you all a little time, money and frustration here).
Cover area outside (or in an extremely well ventilated area) where you
plan to spray with newsprint or other protective covering — we used cut
up grocery bags that we had on hand for projects like these.
Thoroughly clean and dry all glass pieces you'll be working with — you want to make sure the glass is clean in order for the spray to fully do it's thing. Fill a spray bottle with 1 part water to 1 part white vinegar and shake to combine. Set nozzle of spray bottle to it's finest mist setting. Put on any protective gloves or masks you wish to use and let's get started!

This is where I armed myself with my water/vinegar spray bottle in one
hand and my looking glass spray in the other. First gently spray a fine
mist of vinegar/water on the outside* of your glass container; you are looking for small droplets of water that bead up and do not run.
Follow up the water/vinegar spray almost immediately with a gentle and even layer of the metallic spray.

*Note about spray: if you are like me, you read all the directions and warnings on the
looking glass spray before using, so you know it requires lots of
shaking before and between use and recommends using on the inside of the glass — this is where
you need to trust me — I (gasp) used it on the outside of the glass. I
did this because I wanted to actually be able to put things like flowers
and candles inside the containers and the end result was good for me,
so I'm just putting it out there.
Allow to dry for just a minute and apply another fine mist of water/vinegar solution — then let them sit. Here's what our glass containers looked like as they began to dry with both sprays applied — notice the fine beading from the water/vinegar solution creating variations in the mirror spray:


Allow to dry for about 2 minutes, then gently blot the beads of water/vinegar with your paper towel — they should lift off areas of the mirror spray in a varied pattern. Don't rub very hard as the metallic finish will streak, though you can apply gentle pressure in various places to achieve a more realistic and varied mercury glass look. Don't worry that the glass is still see-through at this point, since you'll be doing several thin layers to build up the look over time.

Just repeat the same process over and over, and rotating between resting your glass container on its base versus its top so you get full coverage. All in all I probably went with between 3-4 coats in total.

You want to go with several thin and even layers of the spray to avoid
runniness and splotching — trust me, the end result is worth the
patience. Keep building up your layers until you are happy with the overall look and feel of your containers — then allow to dry for at least 3 hours until bringing inside or off the protective covering; you want them to set and seal.
After your container is completely dry, now you are ready to either tweak or style. If you think an area needs a little more or less coverage you can simply spot treat with more spray or spray with more water/vinegar and continue to blot away the treatment — this is where you own creativity and taste come into play.

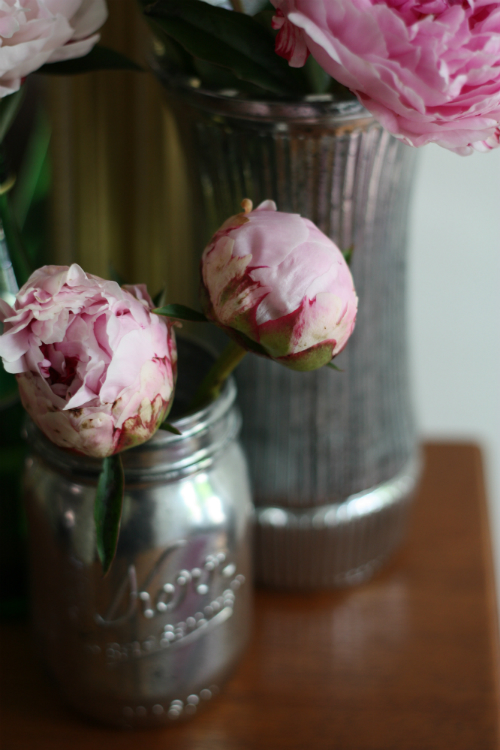
Once complete, the creative uses are endless. I played around with different flower arrangements around the house since I had some beautiful peonies on hand from Tim. I found some convincing faux peonies here, too.


I just love how the little distressed and antiqued details came out — they really do show as something that's been lightly worn away over time (something I was skeptical about going into this project).


On the milk bottle specifically, I was hoping the spray might just go right over the blue logo text to make it look like a single old milk bottle — while the spray didn't erase the text, it did completely seal it in a silvery look that almost pronounced it even more. I was surprisingly happy with the end result here.

You might also notice exactly how well the promise of
"looking glass" or the mirror effect came into play as with each photo I
tried really hard to avoid getting my own reflection — without luck,
haha.

I've been really excited to try out this tutorial because I'm thinking a mix of several of these antiqued containers with other little vessels here and there might make really beautiful, not to mention affordable diy touches for our wedding decor next year — flowers and votives anyone? Tim and I are both really happy with the outcome of these test pieces, so we'll definitely be looking for more glass odds and ends over the next several months that could fit well together for the wedding reception.
Like I said in the beginning of the post, the possibilities for this antique mercury glass finish are endless so long as you start out with a clean piece of glass — I'm still dreaming up visions of lamps, groupings of mirrors and other accessories inspired by the images below:

Credits: Mirror Grouping, Mirror Knobs, Mirror Trinket Box, Mirror Lamp.

Credits: Mirror Pendant, Mirror Table Lamps, Mirror Table, Mirror Wine Stopper.
Tim has been more on the fence with the whole antiqued mirror glass lamp idea, so this could be a great way to test it out on something bigger without breaking the bank.
Other ideas we thought of that might work well with this spray include:
- Candy Jars
- Furniture knobs
- Pillar candle holders
- Table or pendant lamps
- Glass holiday ornaments
- Colored glass votives or bottles
- Glass desk caddy or pen holder
- A serving tray or tray that holds candles
- An antique window with the panes sprayed as a mirror
For anyone wondering where in the house the arrangements we put together are currently living — find them in our downstairs half bath:

This little bud vase is on the edge of my bedside table:

And here's a little fuller view of our entryway with this little mix of glass vases updating the look with some color and shine since the last time we had flowers in this space:

They've added a colorful update to these little spaces and were fun to pair up with a few green glass water bottles we had laying around too. Find our full house tour here.
All in all, we both love how well this faux finish turned out and
couldn't be more excited to share it with each of you since it was so
simple! Keep us posted should you try it out — we'd love to see what you
come up with.

So what do you think — would you try this? What piece of glass would you transform with fun diy this finishing technique?
UPDATE: I tried the Krylon Looking Glass Spray for another project, updating the finials on our bathroom window hardware — check out the results here.

Very pleasing results, yes? I especially enjoy the little round glass bowl vase with the speckles! Beauty playing!
ReplyDeleteThanks Brian - this is one of my personal faves too. That and the smaller mason jar!
Deleteoh, I love this!! I tried to create a mirror with silver leaf and the results were worse than not-good. I am going on a hunt for that krylon today. Thanks!!
ReplyDeleteYay! So glad this might be helpful — I think the krylon might do the trick. Keep us posted!
DeleteI want to try the mirror then transfer a photo to the mirror afterwards. I wonder if using Q tips instead of paper towels would work better?
DeleteThis is a project I am definitely going to try! I love the look!
ReplyDeleteSo glad to hear it Lisa — we saw it a few different times pop up across Pinterest and couldn't resist. It's one of those that really works and it a lot of fun since it's pretty simple.
DeleteAwesome awesome awesome
DeleteAwesome awesome awesome
DeleteI love this! Hopefully I'll get a chance to try it out over the summer. I have a problem when it comes to saving glass food jars, so there are plenty of them lying around.
ReplyDeleteHahaha, Faith — we know that "problem." We have the same one with the glass milk bottles we buy. They are just so pretty and even though we know we can return them for the deposit back, somehow they just continue to collect in our house!
Deletewonderful wonderful wonderful!
ReplyDeletelove this proejct, and thanks for all of your helpful hints and inspiring photos, nicies!
you two amaze me!
You are too kind Kristal!! We have a lot of fun with our crazy little projects.
Deletethis is just beautiful Mary, i think i am going to try this!
ReplyDeleteThanks Kathy! I hope you will, this one was a lot of fun in that it packed a big result for minimal effort. Just having the right "tool" did the trick.
DeleteWow... wonderful! Thanks for sharing...
ReplyDeleteOf course! Thanks so much, glad you like it.
DeleteGorgeous! Great DIY project, and one I'll def be trying out!
ReplyDeleteAwesome! Let us know how it works out for you!
DeleteI used this technique on a clear glass lamp from IKEA with fabulous results! I also used the Looking Glass Paint on a matte gold metal frame, which turned out very nicely too!
ReplyDeleteOh what a great idea — I so want to try out a lamp, but love the idea of spraying on wood too.
DeleteWhat about a mosaic piece? With colored stones and the mirrored effect on some glass pieces?
ReplyDeleteAmanda we love this idea!!
Deletethanks for sharing this technique!
ReplyDeleteThis looks beautiful! I have an old coffee table that I might just have to try this on. =)
ReplyDeleteOh! We would love to know what it would look like on a coffee table! Keep us posted!
DeleteWhat a wonderful idea. your tutorial was so well explained. I love the idea of the coffee table!!
DeleteYesterday I went looking for the spray paint, but to no avail. I tried walmart lowes and home depot. Help??!!!??!?
ReplyDeleteOh no! Try craft chains like Hobby Lobby or Michael's if you have them in your area!
DeleteHave you tried this on colored glass? What do you think would happen?
ReplyDeleteJaci,
DeleteNot yet, but it's a great idea — we bet it might give the sheer parts a bit of a nice tint.
Great tut thank you!
ReplyDeleteI really, really, really love your peonies, and peonies with mercury glass are such a classic. Beautiful for a wedding.
Thanks so much — we love peonies too!
DeleteThis is a great tutorial--very clear instructions. Thanks for sharing. I can't wait to try it on all my ugly random glass containers. Have you tried oxidizing or darkening it to give it a more vintage look?
ReplyDeleteHey Steph,
DeleteThanks so much! We haven't tried darkening yet but like the idea — it might make them look even older.
These looks so lovely. Love the effect. And a great tutorial!
ReplyDeleteThanks so much!
DeleteLove the tutorial and love the look of the projects! Im wondering how this finish would work on some brass lamps I have!
ReplyDeleteGreat idea - I bet it would look even more "antiquey" — keep us posted if you give it a whirl!
DeleteI was just curious if the paint comes off on your hands at all since you used it on the exterior? Please let me know! Thanks!
ReplyDeleteHey Buffee Ann — good question. After letting the paint fully dry and wiping it gently all over with the paper towel, it cured up nicely and has not come off on our hands. Hope this helps!
DeleteThanks so much for sharing this way of "faking" mercury glass. I've tried other ways of doing this with so-so results. THIS worked so much better! Also, I even tried this on blue glass...then distressed it even further so that some of the blue would show! Loved it! ~~Robyne~~
ReplyDeleteOh my goodness Robyne, the blue glass sounds amazing — we're so glad this tutorial worked for you and you like the results!
DeleteThis is so amazing. I was just about to get rid of so many glass vases. Not anymore!!!! Thanks so much.
ReplyDeleteYou are quite welcome thanks for visiting!
DeleteWow--I'm so glad you posted this project. I love the look of antiqued mercury glass and this technique has so many possibilities! I will be trying it out very soon. Thanks!!
ReplyDeleteThanks so much Heidi — we hope it goes well and know your end results will be beautiful!
DeleteHi,
ReplyDeleteI love this look and want to try it for my daughter's wedding. Can you give some idea how far one can of spray will take you. We may have 20+ tables for the reception....just trying to think ahead.
Thanks!
Love the idea to do a big grouping for a wedding - we're hoping to do the same for ours! I was able to spray all 4 containers you see pictured with about 4 generous layers with one small sized can of spray. If I were doing it again I think I could stretch it now that I know what I'm doing — also, some of the bottles and vases I used were pretty large so those took up more spray than normal. Hope this helps!
DeleteHello! I just tried this and I love the results! Thanks a lot for sharing! I'm so happy :)
ReplyDeleteLillian - so glad it worked out!
DeleteDo you know if you can use any other type of spray in any other colors? I would love to have this same look but with gold or rose gold, rather than the silver look...obviously the "looking glass" spray is only the mirror/silver color, but maybe a different spray paint could be used?
ReplyDeleteHey Megan — great question! We'll on the lookout for other colors that could produce the same effect and let you know if we come across one. We're sure you could achieve something similar with a little trial and error!
DeleteJust tried this technique and I LOVED the results! Can't wait for my jars to dry so I can play with where I want to put them. :) Thanks for making it so simple!
ReplyDeleteYay Allison, so glad it worked and know they will be beautiful throughout your house!
DeleteThis is a great tutorial! I tried it today and am having one small issue. When I blot it seems that the paint is coming off completely in some spots instead of getting darker spots the way it looks on your finished pieces. Perhaps I am not letting it dry long enough? Just wondering if anyone else had this problem.
ReplyDeleteWe agree try letting the paint dry longer also make sure you are indeed blotting and not wiping this could also make a difference. Thanks for checking in and keep us posted!
DeleteThanks so much for this diy.. i love the look of mercury glass and have so many ideas to try now!
ReplyDeleteGreat please let us know how it turns out!
DeleteDid this today and I am LOVING the results! There are just so many decorative possibilities with this technique! I cannot wait to try this on Xmas decorations! I only wish I had known about this when I got married...I would have loved to use mercury glass in my centerpieces but it is usually so pricey.
ReplyDeleteYay, so happy and wasn't it really easy. Glad you had success! Please visit often as we have many DIY's up our sleeves.
DeleteI tried using a different type of spray paint, Krylon Metallic, and it did not turn out the same. Definitely need to use the Looking Glass spray. Love this!!
ReplyDeleteThanks for the tip Kristen — we are hooked on the looking glass spray!
DeleteIf I spray the inside of the vase, would it create problems for putting flowers and water in it?
ReplyDeleteWe would assume it probably would but have never tried this. Let us know if you learn something different. Thanks for looking.
DeleteLove your tutorial!! Do you know if the metallic spray paint (instead of looking glass) would work the same?
ReplyDeleteWe have not tried that and we know the looking glass is the way to go. If you try that and it works out please let us know! Good luck!
Deletelove this! the mercury glass that my great grandmother and grandmother had oh how I wish I had known... I loved it but I was a kid and my mom didn't keep it. I can't wait to try all of this out, thnx so much for the diy.
ReplyDeleteThanks for stopping by good luck with your project and we look forward to hearing about your results!
DeleteHow long do you wait between layers? I wasn't clear from the tutorial. It says you want to build them up over time, but do you do the next layer immediately after blotting?
ReplyDeleteHey there — we waited about 5 minutes between layers!
DeleteI just returned my Homestead Creamery to Whole Foods yesterday! Now I wish I hadn't. - Leah, leahwise.wordpress.com
ReplyDeleteToo funny Leah — we have a bad habit of never returning ours so we have tons of them around the house!
DeleteThis is awesome!
ReplyDeleteValentina
http://valentinaduracinsky.blogspot.com/
I'm going to do a few vases as a christmas present! This is absolutely delightful!(:
ReplyDeleteThanks Taylor!
DeleteI came here via A Beautiful Mess - definitely going to use this at my wedding next year too! Also, super stoked to discover that you're also a Richmonder :)
ReplyDeleteHi Lindsay and welcome! So happy to hear you are in RVA! If we ever cross paths please say hello! Congratulations on your wedding and hope to see you here often!
DeleteJust happened upon this -- I love the look! You didn't say, once these things are completely dry, can they also be washed normally? Thanks!
ReplyDeleteHey there,
Deletewe haven't put ours through the dishwasher or scrubbed it too hard. I imagine the finish might continue to rub off over time. However, if you put a clear coat over the top of it after the mercury glass spray, you might be able to wash as normal! Keep us posted if you try it and it works!
Yessssss...I LOVE this idea! Thank you thank you thank you for giving me a reason to hold onto all my glass jars! Love!
ReplyDeleteYou are quite welcome thanks for stopping by!
DeleteSuch a great tutorial! I found this through today's post on A Beautiful Mess. I've been thrifting for antique mercury candle holders, now I can make my own. Thanks!
ReplyDeleteGood luck with it Sarah really so easy!
DeleteThey look so dreamy! I love the look, especially with the flowers. It really softens it up and the colors really pop. Thanks for sharing this tutorial!
ReplyDeleteJudy
You are quite welcome and thanks for stopping by!
DeleteLOVE this tutorial! I just purchased a bronze colored antiqued-looking candle holder, and I have been wanting some pieces to match! I am going to try it with a gold or bronze color!! Thanks so much for this!
ReplyDeleteThanks Allie good luck!
DeleteI would love to get some of the milk jars. How did you find them?
ReplyDeleteI HAVE to try this! Love me some upcycles!!
ReplyDeleteIf you do this on glasses, can you drink out of them? What does it say on the paint can about that, anything? Thanks!
ReplyDeleteBeautiful! I think I'm going to try this on a set of old glass lamps I inherited from my grandmother. Can't wait to try it...fingers crossed it comes out great and not ruined!
ReplyDeleteAh-may-zing! I really want to make some for my room. Thanks so much!
ReplyDeleteThank you for your tutorial, it was very helpful. I really wanted the shinier finish so I sprayed the inside of mason jars and found that they may not work for holding flowers in as I originally wanted. I have not sealed them yet, so maybe that will help.
ReplyDeleteI have found that water quickly takes off the paint and wonder if you found this when washing yours?
You solved my problem! My daughter is getting married & insists the table decor has to be small! She wants everyone to be able to "visit" without an obstruction. I am going to find the right globe and hit it with this. I'm also going to try to find clear glass for my back splash and in my bathroom. I figure if I seal them well, they will look amazing. I'll try a little area first, but I'm excited about this!! Thanks a bunch!!!
ReplyDeleteOh so glad to hear it — keep us posted on how it all turns out. LOVE the idea of your back splash!
DeleteOh my word. I have some old jars laying around that I wanted to do something with! I know what I'll be doing this weekend! Thanks for the fabulous tutorial!
ReplyDeleteGreat tutorial, thanks!
ReplyDeleteThis is great! I'm planning to try this for my wedding but will be using about 30 vases in a variety of sizes/styles. Do you have an idea of how many pieces you can do per can of krylon? Thanks!
ReplyDeleteI found a really cute vase the other day at our local second hand store. It is this horrible blue color and I'm dying to try this on it. Do you think this would work on a ceramic vase?
ReplyDeleteI was just wondering about the vinager...can it be apple cider or does it have to be white? And does it affects the paint after the paint is sprayed on or only if the water/vinager is sprayed on first?
ReplyDeleteSO EXCITED TO FIND THIS! We are using vases like these from a store for our wedding but we weren't able to find enough! now I can make my own!!! Testing this tonight!
ReplyDeleteI am so glad I found this it totally works - I used it for my kitchen backsplash - see results here www.jaeks.com/jj.htm
ReplyDeleteAnn Sacks tiles would have been thousands of dollars and this DIY looks just as good! Lots of trials and tribulations but all good. Clear glass tiles cut, paint one side; goes on the wall with glass side out. Used lots of layers, mirror, silver, and specs of black spray paint for extra aging. Attaching with silicone calk worked the best. Love the results!
LOVED seeing your back splash — looks amazing. What a creative and clever use for this method! Thanks for sharing!
DeleteI think it would look cool to use it on the prisms of a chandelier.
ReplyDeleteWow, that would look cool. Let us know if you try it!
DeleteI think this looks so much better with the paint sprayed on the outside, I've seen others spray it on the inside of the glass and if the glass is too thick it just looks like a sheet of aluminum foil put in a glass b/c you see the clear glass before the silver color.
ReplyDeleteThanks so much Brenda!
Deleteis there a way this would work on a cermanic lamp? If not,Any ideas on how to get this look using something different?
ReplyDeleteThe material is definitely made for glass but we too have a lamp we have been wanting to try it on. If you get to it before we do please let us know. Otherwise if we try it we will certainly publish it on the blog!
DeleteCool idea on a very cool blog. I trinkt it is kinde of diy thak I can handle with my dad. He loves such ideas!
ReplyDeleteLet us know how it turns out!
DeleteI did this just a few days ago and got great results!! I love it! I posted pictures of my pieces on my blog and made sure to post the link to your tutorial! Thanks!
ReplyDeleteVery informative blog post.Really looking forward to read more. Keep writing.
ReplyDeleteWeb Design In Usa
Hey, love this idea and so excited to try it! The other thing is i was thinking of trying this on a glass beer mug for my bf for christmas but not sure if it is harmful/washable. Any info would be greatly appreciated!
ReplyDeleteMelissa, it would certainly work on a beer glass. It will come off in the dishwasher over time and we would not recommend using this method on a drinking glass. Hope that helps!
DeleteLove it! Trying this today!
ReplyDelete(please fix all the typos it's=it is)
Fun!
ReplyDeleteHi, so glad to see someone brave enough to try spraying on the outside, which is what I need to do, as the pieces I have in mind are opaque. Can you confirm that, although about 2 years have passed since you sprayed these pieces, the mirror finish is still strong and unmarred?
ReplyDeleteI inherited a pair of 1970s avocado-green lamps from my mom because, frankly, nobody else wanted them. After they are rewired (the wiring is quite "crunchy" and dangerous), I want do something wonderful to make them pretty to the point where my sister will try to convince me that our mom would have wanted her to have them. :D I think I would need to rewire first because the finish might be damaged during the rewiring process? Agree?
The color is a truly hideous green, but the lamps themselves are a pair of graceful medium-sized ginger jars, which is a classic shape that goes almost anywhere. With some brand-new lampshades, they'll be amazing.
This is fab! I stumbled across this yesterday and I couldn't sleep in excitement to try. After calling all over town to find my Krylon I finally had my Mission:Accomplished. I just finished a sample piece - waiting for it to dry! Love! Thank you.
ReplyDeleteI have wanted to try this for a while! you just gave me the push I needed. have glass vases and candle holders that I cant wait to paint!!!!
ReplyDeleteThese are so pretty! I have been wanting to make "mercury glass" for a long time.
ReplyDeleteBoth of my daughters just moved into their own (separate) apartments. I had fun helping them set up and decorate their places. I was very surprised they both like the same style of furniture, colors and décor! They BOTH wanted mercury glass pieces.
I had read a way to make fake mercury glass is to fill a glass bowl/vase/item with water then quickly pour out the water and lightly spray the inside with silver spray paint.
In this method the idea was to not cover the glass completely.
Now that I have learned your method, I think I'll do both ways and compare!
This is a very cool blog - thanks!!
Julie, thanks again for stopping by and taking the time to comment!
DeleteHow will this finish hold up? I would like to do a glass coffee table top like this if it's durable enough.
ReplyDeleteEverything that we have done basically still looks like we did it yesterday. We are concerned that if you wipe the table with chemical products that might aaffect it. If you try it let us know how it stands up!
DeleteGreat tutorial. I use this method (the outside) too. I tired painting on the inside of a bottle and it never worked right for me.
ReplyDeleteI'm not sure if someone already asked this, but I have a ceramic lamp (with painted flowers on it) that I want to try this technique on. Would this work on ceramic and should I do anything to it before I start your tutorial?
ReplyDeleteWould Krylon Mirror paint be the same as Krylon Looking Glass paint?
ReplyDeleteI tried this with Kryon metallic silver paint instead of the looking glass paint and it turned out pretty well!
ReplyDeleteI read your blog & found that it is really informative if we have small living room. Your ideas are really unique. Thanks!
ReplyDeleteWhen you say you want to add several coats, does that mean:
ReplyDeletevinegar/water
Krylon
vinegar/water
Krylon
vinegar/water
Krylon
And did you end up using a sealer?
Cool hope you I can locate the paint, thank you for sharing your information, cheers from hokkaido
ReplyDeleteHi! I have a question about the antique mirror finish. You did such an amazing job and really the only blog Ive found that has done this look on things other than actual mirrors.
ReplyDeleteSo my question, does method HAVE to be done on glass/mirror material or would it work on a project I’ve already painted?
Thank you!!
Question for you. I used this technique on some fish bowls to use for centerpieces and when I put them in the floral cooler the condensation made it the paint come off on our hands when getting them out to transport to an event. Know of anything that could be used as a sealant?
ReplyDelete