
I finally got a chance to work with some of the vintage jewelry supplies we found back during our trip to NYC and ended up making some simple post earrings that turned out really well.
I've just listed various sets of them in the jewelry shop, but thought it would be fun to show how easy it can be to make your own set of post earrings out of any special materials youmight have on hand.
I was working with various flat backed set vintage dead-stock rhinestones I knew I wanted to make post earrings out of as soon as I laid eyes on them — you might recall I ended up buying the entire bag of them since you never know what will still be around in vintage supply warehouses like the one we visited (more on the supply warehouse in this post).

I've been really into larger sized post earrings of late and these have such a great substantial feel to them without overpowering the ear — they are each about 1 full centimeter round.
So, let's play around with some baubles, yes?

What you'll need:
- Flat backed rhinestones, cabochons or other material of your choosing for earrings
- Ear post backings and ear nuts
- Craft adhesive, like E-6000
- Toothpick (optional)
- Rubbing Alcohol
- Cotton ball

Note on supplies: I used a budget pack of gold plated ear posts and nuts for these post earrings — you can find them in most any craft store or online in any material and fine finish you might be looking for.

Many ear posts and backings come in sets, but you can also mix and match to find what works for your project. I always find great ear posts and ear nuts in the Craft Supplies section of Etsy. Cabochons are a great material to start with when making post earrings since they have flat backings — you can also find lots of inspiration and unique flat backed supplies in the cabochon section of Etsy.
Make sure the flat backing of the rhinestone and ear post are completely clean and dry before applying glue — this will help ensure the strongest bond. You can swipe a small amount of rubbing alcohol with a cotton swab across each surface to remove any oils left from your fingers or debris before the gluing process.

Once clean and dry, apply a tiny dot of E-6000 glue to both the flat backing of your rhinestone or earring material and the ear post backing, then gently press the two together— the goal is to get just enough adhesive to bond the metal without getting that ring of glue overflow seeping out the sides. If you do get excess glue squeezing out the sides, gently wipe it away.


Allow adhesive to set and dry for 24-48 hours before handling or wearing.

Once completely dry, slide the ear nut onto the post backing and you're done — I told you this was a simple project!

Now you've got a new pair of post earrings to add to your jewelry collection — it's so simple, you could make a pair in every color to match your entire wardrobe.

I got some great shots of Stephanie modeling a pair for me before she was about to head out to a JMU basketball game. The gold and purple went together perfectly for the Dukes colors:

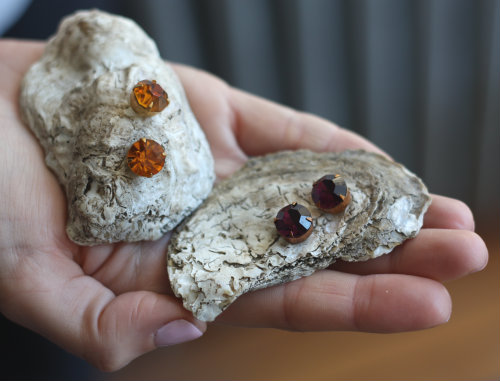
If you want to take things up a notch, you could make a creative display for your new earrings. When Tim saw the sets I'd made, he had the idea to go out to the garage and drill small holes into natural materials like cherry wood bark (that we use for the smoker) and oyster shells — he's a keeper!


I love how the the natural materials really play off the sparkle in these guys.

We'll be back tomorrow with a giveaway (update: find and enter the giveaway post here) for a few sets of these, so be sure to check back! You can also find each of the new sets available and listed in the jewelry shop here.
Discover More:
*| All DIY
Projects |*

I am a fan of post earrings but it's rare to fine ones I think are cute. I'd love to make my own. Thank you for these simple instructions. I also like your wooden display. Tim is indeed a keeper ;-)
ReplyDelete