
Today we're excited to share one of the fall pumpkin decorating projects we've taken on this season — making live planters out of carved pumpkins!
A front porch update has been on our list of decorating ideas we wanted to try this season and we used the following images as inspiration to get our creative juices flowing:

Original project idea can be found on Better Homes and Gardens (3rd image in the slideshow) and both below from Martha Stewart.

We'd already gotten our pumpkins this year and had a few bright yellow mums in the planters we snagged at a neighborhood yard sale earlier this month all hanging out on our front stairs to "fall" things up a bit. Guess who can't stand it when we go out front to take photos and he isn't allowed to follow?

While we loved the autumn look the plants and pumpkins were bringing to the front of
the house, we definitely wanted to take it up a notch with the pumpkin
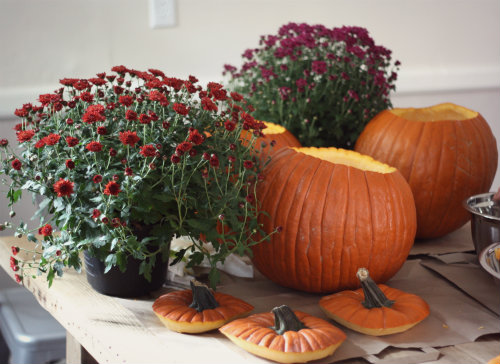
planter idea, so we picked up 2 more colorful mum plants and brought the pumpkins inside to get started!

After wiping the excess dirt off the pumpkins, I just carefully cut a wide circle around the top edge of the pumpkin and removed the top. I cut wider than with a regular jack-o-lantern since we'd be putting live plants in the pumpkin and I wanted lots of room to add fill dirt and let those plants get happy in their new home.

I set the smallest of the 3 pumpkins aside to tackle for our jack-o-lantern (details coming tomorrow) and started roughly scooping out all the seeds and other insides from the larger 2 we'd be making the planters out of.
Side Note: We always like to save the seeds from pumpkin carving to make and enjoy roasted pumpkin seeds the last week of October — it's such a fun tradition. We use this recipe and method for roasting them.
I didn't worry too much about scraping the insides of the pumpkin perfectly since they wouldn't be carved further and we'd be filling them with dirt. So after removing the tops and a quick clean of the insides, we were ready to bring these guys outside to get them planted.
First, we flipped them over and drilled 4 holes straight through the bottom of each pumpkin to allow for drainage. Since these will be living plants in a natural planter, we wanted to try to do everything we could to help extend their growing time. Mr. Curious was on site to inspect each hole:


Then we flipped them back over and filled in a shovel full of dirt into the base of each pumpkin:


Once the dirt was in and we'd tested the fit of the flower plants, we were able to slide them down into the pumpkins and fill in dirt around the remaining empty areas inside and near the top of the pumpkins:

With a quick wipe down and healthy watering, we were ready to call our planters complete!

After making the planters, it was just a matter of fussing around with their placement on the front stairs to achieve that "autumn bounty but perfectly balanced" look you always see done so well in the seasonal versions of magazines, haha:


I'm not confident we pulled off the placement like the masters do, but we're in love with how our little pumpkin mum planters turned out:
Basil's been keeping a watchful eye on them:

Please ignore all those doggie nose prints on the glass — it's a constant losing battle on our part. We even brought the pumpkin planters back inside for a little while to fuss around with a centerpiece:
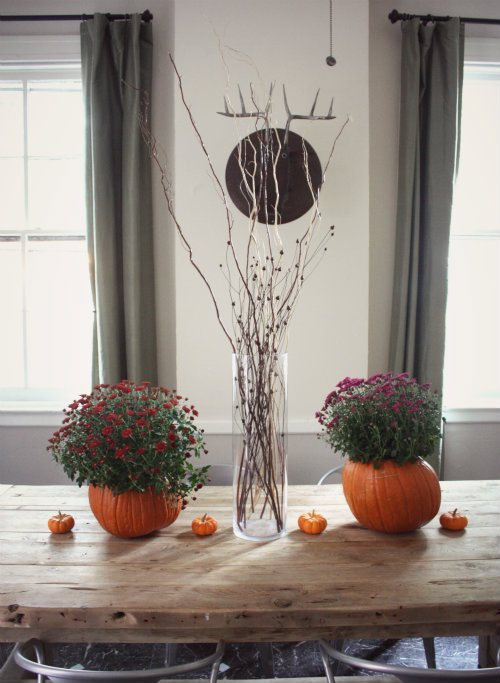
I just brought the tall glass cylinder vase full of branches we keep in our front entry back to the middle of the dining table and placed each pumpkin planter on either side of it. Then I brought all those little baby pumpkins we had around the house back there to toss in the mix too!


We thought a big statement centerpiece like this could make for a fun party table throughout the fall into Thanksgiving.
Discover More:
Affiliate links included—thank you for supporting our DIY projects! 🎃✨

Holy moly I LOVE those!! They make a fantastic centerpiece.
ReplyDeleteBeautiful!
ReplyDeleteI love how these turned out. I had this pinned but never got around to it. Love your table and chairs also!!
ReplyDeleteThanks so much! We've had a lot of fun trying to figure this room out!
DeleteAll proper pumpkin carving must involve power tools. I think that should be a rule written somewhere. Nice job!
ReplyDeleteHahaha, thanks Sarah! We're thrilled to have found your blog and be following along now!
DeleteSuper cute!
ReplyDeleteOh wow, I love these! I always feel like I'm wasting my pumpkins...not displaying them like I should. This looks really great! I would LOVE for you to link this up at my Ginger Jamboree Link Party!!
ReplyDeleteThanks Megan, can't wait to check it out!
DeleteThese are fantastic!! I especially love them displayed on your table. btw, your dog is so cute :)
ReplyDeleteThanks so much Tamsyn — we are pretty smitten with that furry little fellow!
DeleteSuch a great idea. I love how it looks on your front steps! And the dog checking everything out through the window is pretty adorable too!
ReplyDeleteHaha, thanks so much! He is definitely our curious little fella!
DeleteOh my goodness! I just found your blog today and I love it! Then I hit this post and saw that you have the same giant metal deer sculpture we have and now I love your blog even more!!! Lol
ReplyDeleteThat is too funny Detta — what a small world! We love you even more too knowing you have the same deer sculpture, haha!
DeleteThis is such a cute idea! How long did the pumpkins last?
ReplyDeleteHey Randy! Thanks so much — they lasted a good 3-4 weeks after carving on our front stoop!
DeleteTammy at ldyatplay@yahoo.com
ReplyDeleteDo you re-pot the plants once the pumpkins start rotting or just throw them both in the mulch pile? How much room do you need to start a mulch pile and do you get lots of rodents with that pile?
I did this in a HUGE planter we have in the front yard last year. THIS year, we noticed a pumpkin plant growing and, after looking at your site, I realized that there must have been seeds left behind from last years pumpkin display. I moved this years' plant to the raised garden bed in the back of the house, and it has two pumpkins growing on it so far. Love your site!
ReplyDeleteWonderful news! Thanks for the kind words!
DeleteIt looks absolutely wonderful. I'm gonna try with plastic pumpkins maybe, so they'll last longer. And those doggy nose prints are adorable. We have them too and we don't even think of it as a battle. Hey its 'Arfwork'...����
ReplyDelete