Today we're excited to share a project I've been working on over the past couple weekends for the wedding — DIY hanging mason jars with frog lids for holding flowers...
Our ceremony is going to be in an outdoor garden setting, so not much decor will really be needed. I thought that these could be a minimal way to bring in a little color and personalized feel along the aisle, tying everything together.
We've seen this idea crop up on a lot of wedding sites for outdoor and garden type ceremonies and thought it was so clever. I used the following image from Style Me Pretty as inspiration for making our jars:

Image via Style Me Pretty
I'm hoping we'll either be able to hang them from Shepard hook style garden hangers like in the image above or from the aisle chairs themselves. Turning the caps into frog lids is a helpful trick in floral arranging — the metal grid makes the flowers stay in place exactly the way you want them and holds them that way for you:

So let's make some hanging mason jars with frog lids!
To start out you'll need some mason jars. We got a couple bulk boxes of wide mouth quart size jars from our local hardware store, you can also find them online, here:

You'll also need:
- Metal hardware cloth
- Coiled wire
- Wire cutters
- Glue, like E-600
- Permanent marker
- Scissors
- Garden twine, wire, or other medium for hanging jars
- Scrap paper or drop cloth for protecting work surface

Oh and a good pair of gloves!

Yes, those are pink Black & Decker work gloves that Santa left in my stocking — and they are my favorite. Safety first, ladies!
Let's get ready to make a mess, yes?

Start out by unscrewing the lid from a jar and popping out the flat lid from the band. You can set these aside to use for canning replacements or other projects — we won't be needing them (except for one for tracing) for this project any longer:

Wearing your gloves, carefully begin to unfold the metal hardware cloth:

You can find hardware cloth like this at most any hardware store in the outdoor fencing section. It's basically like a supersized strong screen material and comes in different size rolls — the smallest we found was 24x10 inches which was way more than we needed, but Tim assured me there would be plenty of future projects we'd be able to use the excess for. You can also find it online here if you don't have luck at the hardware store.
After carefully unrolling the hardware cloth, use one of those jar lids we set aside as a template for measuring where to make cuts with your wire snippers:

I cut an entire strip up the width of the metal hardware cloth (like cutting a long strip of wrapping paper), then cut little squares from the strips, using the lid as a guide. I figured it would be easier to just cut enough for all 12 lids and roll the hardware cloth up to put away instead of doing everything individually.
You should end up with several little squares of hardware cloth just bigger than your jar lid like so:

From here, place the lid onto each square to again use as a guide, tracing around it with a permanent marker:

You're just marking the hardware cloth to show you where you'll need to make cuts again with your wire snippers. Tip — I liked to hold the lid down over the "bent up" side of the square to help flatten it out for the next step (also, please forgive the mix of gloves on/off shots — I made a few test rounds of these using the gloves and made Tim come take photos later on of all the steps requiring two hands that I couldn't photograph myself, ha)!
Make cuts where you marked the hardware cloth in order to get a round shape exactly the same size as your lid template:

I quickly learned it was best practice to make cuts just below where I'd marked with the marker.

Your new little hardware cloth circle should fit easily into the band of the lid — if your cuts hang over the edge and won't slide in, just make necessary cuts until it slides in but the edges still hang over the inside rim. Once fitted inside the band, dab thick dots of glue over each wire endpoint:

If your wire circles aren't perfectly flat and some of the edges stick up from the glue, find something heavy from around the house to weight them down while they dry. We used a set of antique Austrian kitchen weights handed down from Tim's grandmother:

If you don't have actual weights, a can of beans or bottle of beer/soda should do the trick! After the glue has had time to dry (we let ours sit for 24 hours), your frog lids are now complete and ready to just twist right back on top of your jar:

How simple was that!?
Now you've got a set of mason jars with frog lids, ready for flower arranging! You can stop here if you want and use these as pretty centerpieces or decorative updates. If you want to make them into hanging planters, just follow the steps below in the second part of this tutorial...
PART 2: Let's make 'em into hangers!
For the second part of this project, you'll just need the coiled wire, wire snippers, the garden twine and some scissors:

First we'll make a wire ring with loops that fits around the mouth of the jar to support the hanging twine.
Snip a length or wire that would wrap 2 times comfortably around the mouth of your jar. This will allow enough wire for you to work with, without wasting a bunch of excess. If your wire came wrapped in a circle, loosely keep the round shape to help guide you through the next steps:

Make a loop on one end of your wire, wrapping the short end back around the loop once, leaving a little bit of excess wire on that short end:

Hold your loop at the mouth of the jar, on the bottom-most lip and wrap the wire against the mouth using your other hand until you reach halfway around the jar — opposite your first loop:

You've just made a guide for where your second loop needs to go. Pick the wire back up and make another loop with the excess wire (just flip it back upon itself), again, wrapping the excess wire back around the loop once:

Fit the wire back around the bottom lip of the jar and just pull your remaining wire around to meet up with your first loop. You should have a full circular shape with two loops opposite one another. Wrap the last of the wire at least once fully around that first loop and just snip off any excess pieces of wire as close as you can to your loop:

Don't worry if you don't finish connecting the final wire perfectly tight, because once you have it wrapped securely, you can simply twist the loop with your fingers to tighten the wire ring around the mouth of the jar:

Here's what we'll end up with:
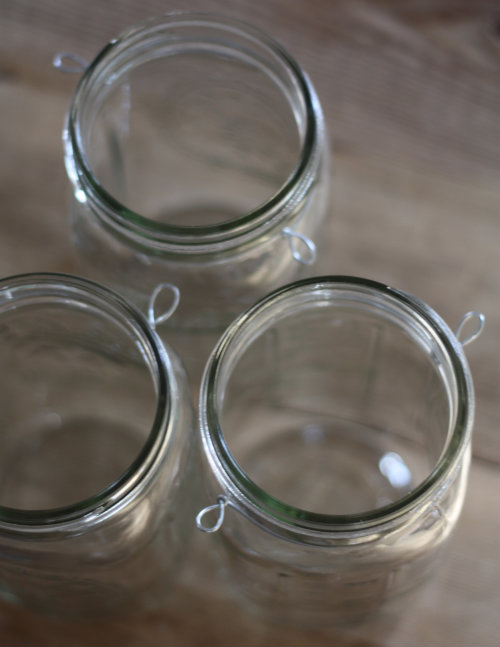
We've got two little loops, strong enough to hold some thick twine to make hangers out of these jars. Just cut enough twine so your jars will hang at the length you want them, then double it over on itself to make it stronger. String through your wire loops and finish with a bow:

Now your hangers are complete!

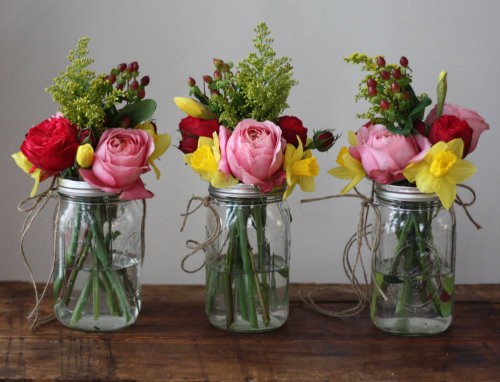
Once the frog lids and hanging twine are ready, it's time to start breaking out the flowers and impressing yourself with how easy the frog lids make flower arranging — you are going to feel like a pro in no time! I filled my jars about a third of the way up with water before starting to insert flowers just to avoid spills later on:
Once the frog lids and hanging twine are ready, it's time to start breaking out the flowers and impressing yourself with how easy the frog lids make flower arranging — you are going to feel like a pro in no time! I filled my jars about a third of the way up with water before starting to insert flowers just to avoid spills later on:

For a simple arrangement, remove the green leaves from the stems and snip them at your desired length, then slip them through the holes in your frog lid on an angle as you please:

Continue to add more flowers and filler at an angle, building up layers until you are happy with the look of your arrangement. Here's how mine ended up:

Not bad, right?
For the full step by step guide on how I made this flower arrangement, see this post.
The beauty of the frog lids is in how they will literally keep your arrangement sealed in place, exactly the way you want them. With the twine in place, all you'll have to do is hang them when you're ready.

I'm pretty excited with how these turned out and it ended up being such a great practice run in arranging the flowers for our wedding. Right now we've got the test jars set up in a line as a little centerpiece on our dining room table:


Discover More:

Oh so gorgeous. I'm excited to see how all the bits and pieces you've shared here on the blog come together on June 1. It's going to be beautiful.
ReplyDeleteThanks Monica — let's hope it all comes together, ha!
DeleteThese are so beautiful! What a great idea :)
ReplyDelete-Cole
Young Mommy Memoirs
Thanks Cole!
DeleteThey're so pretty, Mary! I love them set up as a center piece on the table too. Have a blast fine tuning all of the details - the next couple months are going to fly by. I can't wait to see pictures of the big day! Congratulations!!
ReplyDeleteThanks so much Jillian!
DeleteReally pretty and simple! I think they would look even prettier with a few drops of food coloring added to the water. Just an extra touch of color.
ReplyDeleteOh I like that idea — so creative!
Deleteloved loved loved it... and the clear step by step is Perfect!! thanks for sharing. Cheers! *MonicaV*
ReplyDeleteThanks for taking a look!
DeleteThis comment has been removed by a blog administrator.
ReplyDeleteWOW - what a wonderful alternative to expensive centerpieces. Great job with the instructions. Thanks
ReplyDeleteKathy, thank you for the kind words and for stopping by!
DeleteThank you! So easy to follow and really appreciate the links on where to order some of the material!
ReplyDeleteThese are gorgeous! Nicely done!
ReplyDeleteCan you tell me the size of this jar?
ReplyDeleteThat is such a great idea! I was wondering instead of using the metal wire hardware cloth, you could maybe use cardboard and poke holes in it big enough for the flower stems. It seems like it would reduce time and make this a bit more easy to make. Maybe a strong hole puncher could be used to make the holes for the flowers. I know it could potentially get wet, but i dont think it would get so wet that it would fall apart. Thanks so much for the inspiration!
ReplyDeleteHi! This is such a cute idea! I'm thinking about making these for my wedding. Can you tell me approximately how much each jar cost to make?
ReplyDeleteThank you!
~Shayna